Hi,
Below you will find a very interesting post and explanation from Andrejus:
Andrejus Baranovskis's Blog: Bug in ADF 11g R2 View Criteria Bind Variable Time...:
Regards,
Saturday, April 28, 2012
Having a non BC Drop Down Select component with list items From BC Data Control. ADF 11g
Hi,
in this example we are going to create an application where we will have a drop down list where it's value is going to be stored to a managed Bean.
The list Source is going to be from a Data Control that comes from Business Components.
Countries for example, from HR Schema.
The goal here is to demonstrate that is possible to have a list of Values component that belongs to "a" DataControl(in our case, we are using a ManagedBean) and uses a list of possible values from another DataControl(In our case, HR Schema, Countries View Object).
Download Sample Application.
NOTE: in this post, we are going to follow another approach of explaining things...
We are going to follow the first thing that it might come in mind. Then we are going to think it over and see the simplicity of things. This is an experimental way of approaching a matter and covers the case where things are not that clear in our mind regarding the best approach to follow. Sometimes I find people accepting solutions "as is" without considering to challenge them. With this approach, we are going to rethink some approaches in order to determine which is the simplest and best. Make sure that you read until the end. We are all busy and we want the solution fast. But, trust me, there is more into it than just accepting the solution.
The case scenario here is pretty simple:
One attribute,
Hold the value in a ManagedBean,
Get the List of Possible Values from a View Object.
We simply create the Business Components:

An Empty Page:

Then, we will have to create the Select One choice Component
From the component palette in JDeveloper, we locate the Select One Choice component and we drop it into the page we created previously.

When we drag and drop it into the page, JDeveloper will show a dialog that will require the following information:
The first screen, requests us to determine whether this Select One Choice will have a binded list or a static list.

And of course, the common properties, such as the value holder.

(Lets think out loud a bit here)
We are dropping a select one choice into a page..
Where is the value held?? uh.. in a managed bean.. (in the example at least..)
-really?? where is that??
-uh.. we have to create it??
-YES! But why did not we do it before dropping the component?
-uh... we did not think that we havent finished with the "model" part..
-Yes, we are used to the bindings and we thought that everything will be generated automatically... Here it is not the case.. Alright, lets create a java class..
-what about this wizard? The one of the Select One Choice?
-Cancel it..
-Are we forgetting something??
-no! it's cool.. We got this, it is the java class missing.. the bean..
-ok.. (dont hold your breath just yet...)

Great,
now?
-now... now, we will place the setter and the getter to the Select One Choice component...
-ok.. so? how are we going to do it?
-Simple, we will add #{javaClass.lovValue} in the value property of the Select One Choice.
-Are not we forgetting something?
-uh..... no..
-ok.. lets proceed then..
-oh wait a minute! we are working with JDeveloper! lets do it declaratively!!
-yes! lets go.
Lets drop the Select One Choice once more..
(The same procedure again.. If only we had thought of this earlier.. We would have solved several wizards and clicks..... anyway)
So, after doing the same process again, we select the value and expression builder:

a closer look:

-where is it??
-where is what???
-The bean..
-what bean?
-the bean!! the managed bean!! the javaClass we created! where is the bean!!! (oh... JDeveloper and it's wizards.. Declarative development they say.... what do they know.... I will put the EL on my own and everybody is going to be happy..

-Good.
-Uh.. I think we forgot something here...
- No we did not..
-Are you sure??
-yes yes.. We got this..
-ok... (....)
-press finish..

-It kind of looks weird.. Does not it?
-What do you mean?
-The Value has errors.. It is strange... maybe it something from the IDE wrong.. (As usual... somebody else's fault)
-WELL, it is not actually strange.... (do you remember inversion of control??)
-oooh... we have to set up the managed Bean... I totally forgot about that!
-it happens..
-well actually, I was confused because with JDeveloper wizards produces everything by default when making actionListeners and valueChangeListeners...
-well yes.. but we should not forget the basic principals.. dont you think?
OK after setting the managed Beans:

There is no more errors, plus, we are able to see the bean in the wizard.. (Wizards, do know in the end.. )

OK.. everything seems to be ok..
-Lets Run The Page!!!!!
-are we ok with everything??
-yes yes!!
-Maybe it would be better to do a small recap before deploying and running the application..
-Lets see,
-.....
lets open the page with and see the source code of the SOC (in the page select source tab):
What do we see here?
-We see that the select items is empty.. This is quite correct since, we, forgot to finish the JDeveloper wizard with all the needed values properly.
So, we have to do it manually now..
We have to know how to do it manually as well, simply because we have to. Wizards are good, but we really need to know what actually happens.
Ok. here is what we have to do:
ok, the page Definition creation is very easy"
right click on the page and then select Go To page Definition.. JDeveloper will tell you that there is no page Definition and will ask whether to create it or not. Create it of course. After that, we have an empty page Definition:

Then, we have to add the list:


Then , we have to select a Display Attribute.
The value of this attribute will be shown in the SOC. This is the value the user will see.

Press ok and we are done with the creation of the list. the pageDefintion code is now updated with the following:

Ok.
All we have to do now is to update the SOC with this list.
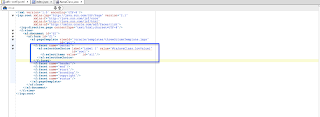
We locate the jspx and we view the source code. We locate the SOC and we change the value property of the f:selectItems components to:
For those of you rushing to say that there is no items property in the SOC. Look closer.
The select items is a separate component. Further more, here is a screen with the declarative way:

Finally, we are done:

Download Sample Application.
Regards.
in this example we are going to create an application where we will have a drop down list where it's value is going to be stored to a managed Bean.
The list Source is going to be from a Data Control that comes from Business Components.
Countries for example, from HR Schema.
The goal here is to demonstrate that is possible to have a list of Values component that belongs to "a" DataControl(in our case, we are using a ManagedBean) and uses a list of possible values from another DataControl(In our case, HR Schema, Countries View Object).
Download Sample Application.
NOTE: in this post, we are going to follow another approach of explaining things...
We are going to follow the first thing that it might come in mind. Then we are going to think it over and see the simplicity of things. This is an experimental way of approaching a matter and covers the case where things are not that clear in our mind regarding the best approach to follow. Sometimes I find people accepting solutions "as is" without considering to challenge them. With this approach, we are going to rethink some approaches in order to determine which is the simplest and best. Make sure that you read until the end. We are all busy and we want the solution fast. But, trust me, there is more into it than just accepting the solution.
The case scenario here is pretty simple:
One attribute,
Hold the value in a ManagedBean,
Get the List of Possible Values from a View Object.
We simply create the Business Components:
An Empty Page:
Then, we will have to create the Select One choice Component
From the component palette in JDeveloper, we locate the Select One Choice component and we drop it into the page we created previously.

The first screen, requests us to determine whether this Select One Choice will have a binded list or a static list.

And of course, the common properties, such as the value holder.

(Lets think out loud a bit here)
We are dropping a select one choice into a page..
Where is the value held?? uh.. in a managed bean.. (in the example at least..)
-really?? where is that??
-uh.. we have to create it??
-YES! But why did not we do it before dropping the component?
-uh... we did not think that we havent finished with the "model" part..
-Yes, we are used to the bindings and we thought that everything will be generated automatically... Here it is not the case.. Alright, lets create a java class..
-what about this wizard? The one of the Select One Choice?
-Cancel it..
-Are we forgetting something??
-no! it's cool.. We got this, it is the java class missing.. the bean..
-ok.. (dont hold your breath just yet...)

Great,
now?
-now... now, we will place the setter and the getter to the Select One Choice component...
-ok.. so? how are we going to do it?
-Simple, we will add #{javaClass.lovValue} in the value property of the Select One Choice.
-Are not we forgetting something?
-uh..... no..
-ok.. lets proceed then..
-oh wait a minute! we are working with JDeveloper! lets do it declaratively!!
-yes! lets go.
Lets drop the Select One Choice once more..
(The same procedure again.. If only we had thought of this earlier.. We would have solved several wizards and clicks..... anyway)
So, after doing the same process again, we select the value and expression builder:


-where is it??
-where is what???
-The bean..
-what bean?
-the bean!! the managed bean!! the javaClass we created! where is the bean!!! (oh... JDeveloper and it's wizards.. Declarative development they say.... what do they know.... I will put the EL on my own and everybody is going to be happy..

-Good.
-Uh.. I think we forgot something here...
- No we did not..
-Are you sure??
-yes yes.. We got this..
-ok... (....)
-press finish..

-It kind of looks weird.. Does not it?
-What do you mean?
-The Value has errors.. It is strange... maybe it something from the IDE wrong.. (As usual... somebody else's fault)
-WELL, it is not actually strange.... (do you remember inversion of control??)
-oooh... we have to set up the managed Bean... I totally forgot about that!
-it happens..
-well actually, I was confused because with JDeveloper wizards produces everything by default when making actionListeners and valueChangeListeners...
-well yes.. but we should not forget the basic principals.. dont you think?
OK after setting the managed Beans:

There is no more errors, plus, we are able to see the bean in the wizard.. (Wizards, do know in the end.. )

OK.. everything seems to be ok..
-Lets Run The Page!!!!!
-are we ok with everything??
-yes yes!!
-Maybe it would be better to do a small recap before deploying and running the application..
-Lets see,
- Generate BC: done.
- Create java Class: done.
- Declare it as a Managed Bean: done.
- Drop the SOC into the page: done.
- Map the Selected Items: OMG!!! we totally forgot about that!!!!!!! OMG! OMG!
- map the value property:done..
-Ok.. Ok.. what do we do now? Do we drag and drop the SOC again? Do we do it everything from the beginning??
-no.
-But it is easier..
-yes. But we have to learn how to fix things..
-.....
lets open the page with and see the source code of the SOC (in the page select source tab):

What do we see here?
-We see that the select items is empty.. This is quite correct since, we, forgot to finish the JDeveloper wizard with all the needed values properly.
So, we have to do it manually now..
We have to know how to do it manually as well, simply because we have to. Wizards are good, but we really need to know what actually happens.
Ok. here is what we have to do:
- Create a page Definition
- Add a list in the page Definition
- update the code of the SOC in the jspx
ok, the page Definition creation is very easy"
right click on the page and then select Go To page Definition.. JDeveloper will tell you that there is no page Definition and will ask whether to create it or not. Create it of course. After that, we have an empty page Definition:
Then, we have to add the list:

Select the last option. All other options do not suit us, simply because, we do not navigate, we do not have any other Base Data Source to update:

After pressing ok, we have to declare the iterator that will fetch the list of values for this SOC:

Then , we have to select a Display Attribute.
The value of this attribute will be shown in the SOC. This is the value the user will see.

Press ok and we are done with the creation of the list. the pageDefintion code is now updated with the following:

Ok.
All we have to do now is to update the SOC with this list.
We locate the jspx and we view the source code. We locate the SOC and we change the value property of the f:selectItems components to:
For those of you rushing to say that there is no items property in the SOC. Look closer.
The select items is a separate component. Further more, here is a screen with the declarative way:

Finally, we are done:

Download Sample Application.
Regards.
Sunday, April 22, 2012
Getting Started. How to create a UI table (af:table) binded to Business Components. ADF BC
Hi, in this example we are going to show how to create a simple UI table (af:table) which is binded to Business Components.
Once again, I tried to search on the net with the simple criteria:
"How to create an af:table binded to business components ADF 11g"
And I must admit thatI did not get the answer I was looking for. The information was there, but hidden among other solutions and examples. This can be confusing some times.. So this is a small example of how to this. I hope it will clarify you some things.
Here we go.
Do not forget to always consult the official documentation:
http://docs.oracle.com/cd/E28389_01/web.1111/b31974/web_tables_forms.htm
First, I suppose you already have an 11g version installed on your machine along with some database connection already imported to your JDeveloper. In this example we are using JDeveloper 11.1.1.6.0
Start your Engines! JDeveloper, ok..
After creating the Business Components. You should have something like this on your JDeveloper:

In this example we are using the Countries table from the HR schema.
Next we are going to create a simple page.
1) Go to View Controller
2) Double Click the adfc-config.xml file to open it in the editor. We choose adfc-config in this example simply because we want to focus on the af:table. We could use Bounded Task Flows but it is no mandatory for this example.
3) We open the components section from the Components palette.
4) We select the View component and we drag and drop it to the adfc-config Diagram.

We havent created our jspx just yet. As you will see in the above screen, the name of the view component is changed to index. The default name was view1. I changed it just for convenience. You can rename it or leave it as is.
5) We double click the the index View component in order to create the page:
In this example we are going to accept the default values and we will just press ok:

After pressing ok:

6) Now it is time to create our af:table which is binded to BC.
But lets just wait a second.
What is an af:table?
According to the Documentation ( click to Enlarge ):

Well, this means that we have to provide a Data Collection to an af:table.
A Data Collection can be a tree binding in the pageDefinition of our jspx!
But wait.. how are we going to create this... what you say... tree binding.. and how are we going to map it to our table?? It is getting a bit complicated.. is not it?
Well, of course not! We will do it with one drag and drop!! Yes thats right! In ADF and JDeveloper, With one drag and drop we can do everything! We can create the table, and map it to our Business Components!
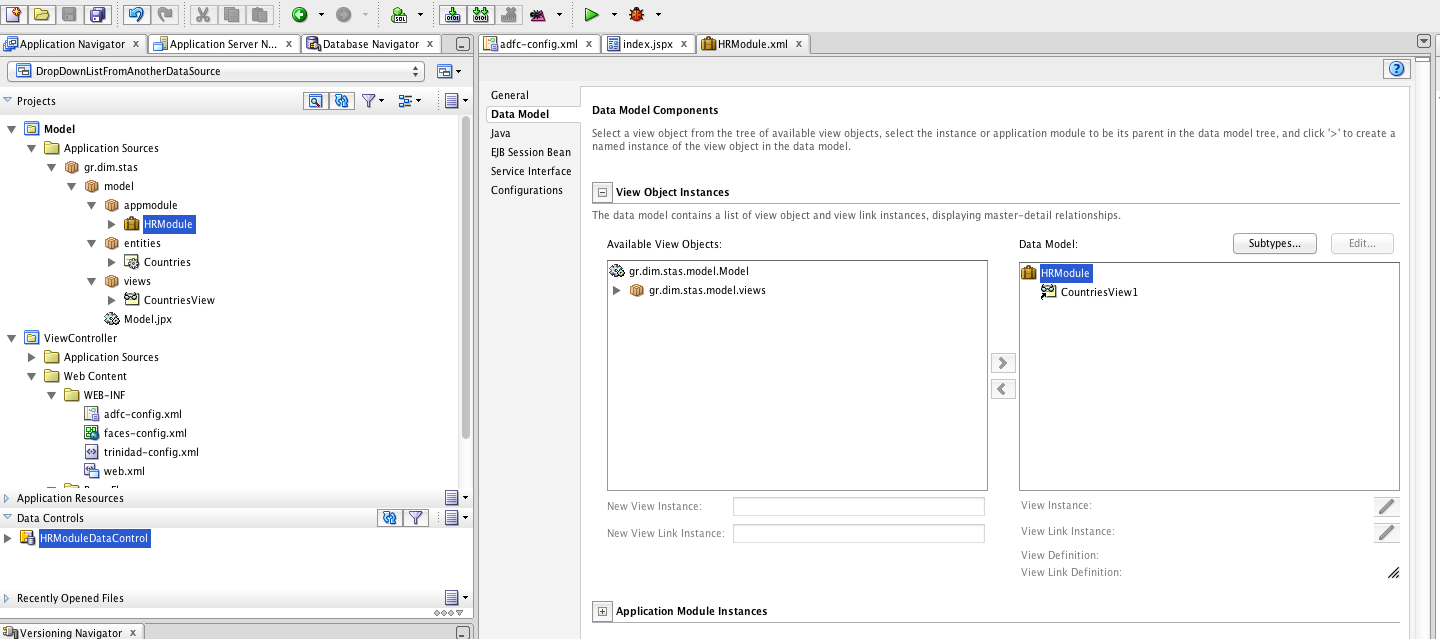
All we have to do is to locate the Data Controls section in our application navigator.

After locating this section, we are gong to find the HRModuleDataControl and then we will find the CountriesView1.
Long Story Short, this Data Control, one might say, that is the Data Control produced by the HRModule Application Module (Data Model).
So, every application module we create, we have it as a Data Control in the Data Controls section of the Application Navigator.
All we have to do is to select the Iterator (View object in the Application Module) and drag-and-drop it onto the jspx as a table.
7) select the CoutnriesView1 iterator. Have the jspx open in the editor. Drag and drop it as a table:

After selecting the ADF table option, another window will appear:
8) set the table options:

The above options, let you decide basic functionalities of the table with simple checkBoxes. Furthermore, they let you control which component you want to use for every attribute of the table. You can set the value of the Display label of every attribute. Furthermore you can add or remove attribute as you want. the most common option is the Row Selection, where you can decide wether you want to select none, one or many rows in your table.
All those options, and more can be configured after you actually create the table.
9) press ok in order to create the table AND the pageDefintion file and the DataBindings file (if the pageDef already exists for this page it will be created again. It will simply be updated. The same goes for the DataBindings as well.)

the pageDef. As you can see, a tree iterBindings was created by the wizard that points to the CoutnriesViews1 iterator which leads to HRModuleDataControl:

DataBindings.cpx file. This files holds the mappings between pageDefs and their pages or method calls and generally, whatever accepts pageDefs. It is the file where you can see those mappings.

And that is it! As you can see, it is pretty easy and rather fun! a simple drag and drop, some options and here we are! we have a live and kicking af:table ready !
Of course, you can always change the properties and experiment further with this component.
Regards.
Once again, I tried to search on the net with the simple criteria:
"How to create an af:table binded to business components ADF 11g"
And I must admit thatI did not get the answer I was looking for. The information was there, but hidden among other solutions and examples. This can be confusing some times.. So this is a small example of how to this. I hope it will clarify you some things.
Here we go.
Do not forget to always consult the official documentation:
http://docs.oracle.com/cd/E28389_01/web.1111/b31974/web_tables_forms.htm
First, I suppose you already have an 11g version installed on your machine along with some database connection already imported to your JDeveloper. In this example we are using JDeveloper 11.1.1.6.0
Start your Engines! JDeveloper, ok..
After creating the Business Components. You should have something like this on your JDeveloper:
In this example we are using the Countries table from the HR schema.
Next we are going to create a simple page.
1) Go to View Controller
2) Double Click the adfc-config.xml file to open it in the editor. We choose adfc-config in this example simply because we want to focus on the af:table. We could use Bounded Task Flows but it is no mandatory for this example.
3) We open the components section from the Components palette.
4) We select the View component and we drag and drop it to the adfc-config Diagram.

We havent created our jspx just yet. As you will see in the above screen, the name of the view component is changed to index. The default name was view1. I changed it just for convenience. You can rename it or leave it as is.
5) We double click the the index View component in order to create the page:
In this example we are going to accept the default values and we will just press ok:

After pressing ok:

6) Now it is time to create our af:table which is binded to BC.
But lets just wait a second.
What is an af:table?
According to the Documentation ( click to Enlarge ):
Well, this means that we have to provide a Data Collection to an af:table.
A Data Collection can be a tree binding in the pageDefinition of our jspx!
But wait.. how are we going to create this... what you say... tree binding.. and how are we going to map it to our table?? It is getting a bit complicated.. is not it?
Well, of course not! We will do it with one drag and drop!! Yes thats right! In ADF and JDeveloper, With one drag and drop we can do everything! We can create the table, and map it to our Business Components!
All we have to do is to locate the Data Controls section in our application navigator.

After locating this section, we are gong to find the HRModuleDataControl and then we will find the CountriesView1.
Long Story Short, this Data Control, one might say, that is the Data Control produced by the HRModule Application Module (Data Model).
So, every application module we create, we have it as a Data Control in the Data Controls section of the Application Navigator.
All we have to do is to select the Iterator (View object in the Application Module) and drag-and-drop it onto the jspx as a table.
7) select the CoutnriesView1 iterator. Have the jspx open in the editor. Drag and drop it as a table:

After selecting the ADF table option, another window will appear:
8) set the table options:

The above options, let you decide basic functionalities of the table with simple checkBoxes. Furthermore, they let you control which component you want to use for every attribute of the table. You can set the value of the Display label of every attribute. Furthermore you can add or remove attribute as you want. the most common option is the Row Selection, where you can decide wether you want to select none, one or many rows in your table.
All those options, and more can be configured after you actually create the table.
9) press ok in order to create the table AND the pageDefintion file and the DataBindings file (if the pageDef already exists for this page it will be created again. It will simply be updated. The same goes for the DataBindings as well.)

the pageDef. As you can see, a tree iterBindings was created by the wizard that points to the CoutnriesViews1 iterator which leads to HRModuleDataControl:

DataBindings.cpx file. This files holds the mappings between pageDefs and their pages or method calls and generally, whatever accepts pageDefs. It is the file where you can see those mappings.

And that is it! As you can see, it is pretty easy and rather fun! a simple drag and drop, some options and here we are! we have a live and kicking af:table ready !
Of course, you can always change the properties and experiment further with this component.
Regards.
Monday, April 16, 2012
Run rcu.sh on a 64bit CentOS machine: rcuHome/jdk/jre/lib/i386/xawt/libmawt.so: libXext.so.6: cannot open shared object file: No such file or directory (A workaround)
Hi,
I started creating a new Virtual Machine on my VirtualBox.
I decided to setup a machine with an oracle XE 11.2 along with the full Christmas Bonus. Weblogic 10.3.6/SOA.. the works..
So, I installed my 64Bit Cent OS 6.
Then I installed my 64biy java.. (ofcourse..)

Then, I installed Oracle XE.. Everything ok.
I installed weblogic standalone.. fine.
Then, I tried to installed the SOA schemas through rcu.. RCU is a powerful tool that really helps when it comes to install and manage all the schemas needed for our Fusion Middleware development
http://docs.oracle.com/cd/E12839_01/doc.1111/e14259/rcu.htm
So, I downloaded rcu from Oracle's site:
Of course, the option is for 32bit JVM only.
http://www.oracle.com/technetwork/middleware/soasuite/downloads/index.html
And of course, it did not work.. I got an exception similar to the following:

So, I googled a bit, I even installed some libraries to my CentOs.. but no use.
A very useful article is the following:
https://blogs.oracle.com/tejas/entry/running_rcu_on_oel_linux
The above article explains how to install the rcu in the silent mode, passing all the parameters needed.
The above was a bit complicated for me so I decided to run the rcu from another 32bit Ubuntu Virtual Machine. Everything went fine.
However, I would really like to run rcu in my CentOs in my 64bit machine and I would really like to have some graphical user interface while installing the schemas.. I mean, I am not that good in understanding all the parameters in the silent mode mentioned in the above link.. Even though it might be a really good practice to do so, still, I would like to have my graphical user interface..
So I start digging a bit more..
I checked the rcu.sh file and I saw that it is using it's own jdk.. which, in my case is not suitable to start the graphical user interface.
So, how would I change the jdk to be used??
One approach would be to change the rcu.sh script.. but of course, this goes against the policies and after all the file is not mine to change at will. Bad things might happen....... :)
(Although, it seems rather easy to do so.. it is just a variable.. but I did not do it.)
A second approach would be to change the bundled jdk that comes with the zip file of rcu..
So, I just renamed the jdk file of the rcuHome file to jdk_old and then, I copied my INSTALLED jdk folder and pasted it to the rcuHome. I renamed it to jdk of course, and I rerun the script.
It worked just fine. All my grrRRRRRRrraphical user interface was there.. Shiny with it's PlastikLookAndFeel!
I did all the steps properly
After that, I reverted my changes and run the script again. The problem was there! So there is a small question in my head that I would like to share it with you...
DISCLAIMER:
THIS POST HAS NO INTENSION OF ALTERING IN ANY WAY THE OFFICIAL DOWNLOADABLE CONTENT OF RCU FROM ORACLE SITE AND IT IS NOT IN THE INTENTION OF THE AUTHOR TO PROMOTE SUCH BEHAVIORS. THIS IS A PURE ILLUSTRATIVE EXPLANATION OF THE FOLDER STRUCTURE OF THE RCU ZIP FILE.
THE CORRECT APPROACH IN THIS PROBLEM WOULD BE TO RUN THE RCU INSTALLER FROM 32BIT JVM AS IT CLEARLY STATED ON THE SITE.
Regards.
I started creating a new Virtual Machine on my VirtualBox.
I decided to setup a machine with an oracle XE 11.2 along with the full Christmas Bonus. Weblogic 10.3.6/SOA.. the works..
So, I installed my 64Bit Cent OS 6.
Then I installed my 64biy java.. (ofcourse..)

I installed weblogic standalone.. fine.
Then, I tried to installed the SOA schemas through rcu.. RCU is a powerful tool that really helps when it comes to install and manage all the schemas needed for our Fusion Middleware development
http://docs.oracle.com/cd/E12839_01/doc.1111/e14259/rcu.htm
So, I downloaded rcu from Oracle's site:
Of course, the option is for 32bit JVM only.
http://www.oracle.com/technetwork/middleware/soasuite/downloads/index.html
And of course, it did not work.. I got an exception similar to the following:

So, I googled a bit, I even installed some libraries to my CentOs.. but no use.
A very useful article is the following:
https://blogs.oracle.com/tejas/entry/running_rcu_on_oel_linux
The above article explains how to install the rcu in the silent mode, passing all the parameters needed.
The above was a bit complicated for me so I decided to run the rcu from another 32bit Ubuntu Virtual Machine. Everything went fine.
However, I would really like to run rcu in my CentOs in my 64bit machine and I would really like to have some graphical user interface while installing the schemas.. I mean, I am not that good in understanding all the parameters in the silent mode mentioned in the above link.. Even though it might be a really good practice to do so, still, I would like to have my graphical user interface..
So I start digging a bit more..
I checked the rcu.sh file and I saw that it is using it's own jdk.. which, in my case is not suitable to start the graphical user interface.
So, how would I change the jdk to be used??
One approach would be to change the rcu.sh script.. but of course, this goes against the policies and after all the file is not mine to change at will. Bad things might happen....... :)
(Although, it seems rather easy to do so.. it is just a variable.. but I did not do it.)
A second approach would be to change the bundled jdk that comes with the zip file of rcu..
So, I just renamed the jdk file of the rcuHome file to jdk_old and then, I copied my INSTALLED jdk folder and pasted it to the rcuHome. I renamed it to jdk of course, and I rerun the script.
It worked just fine. All my grrRRRRRRrraphical user interface was there.. Shiny with it's PlastikLookAndFeel!
I did all the steps properly
After that, I reverted my changes and run the script again. The problem was there! So there is a small question in my head that I would like to share it with you...
Why rcu comes bundled with a jdk? And if it is.. why cant we set the jdk path as a parameter in order to be able to run it with a 64bit one? (At least, I could not find a way. If you have one, please share!)
DISCLAIMER:
THIS POST HAS NO INTENSION OF ALTERING IN ANY WAY THE OFFICIAL DOWNLOADABLE CONTENT OF RCU FROM ORACLE SITE AND IT IS NOT IN THE INTENTION OF THE AUTHOR TO PROMOTE SUCH BEHAVIORS. THIS IS A PURE ILLUSTRATIVE EXPLANATION OF THE FOLDER STRUCTURE OF THE RCU ZIP FILE.
THE CORRECT APPROACH IN THIS PROBLEM WOULD BE TO RUN THE RCU INSTALLER FROM 32BIT JVM AS IT CLEARLY STATED ON THE SITE.
Regards.
Subscribe to:
Posts (Atom)