Showing posts with label ADF. Show all posts

Saturday, November 10, 2012

Oracle ADF Mobile: adfmf-application.xml and adfmf-feature.xml Part 1

Hi,

In this article we will try to understand the meaning of those file descriptors.
This is the first part of this article regarding those file descriptors. We are going to have a very simple approach on things..

adfmf-application.xml

adfmf-feature.xml


-When are they created?

Those files are created when you create a new ADF Mobile application. (see Hello World Post)
Also check the following link (official Oracle Documentation ):

http://docs.oracle.com/cd/E35521_01/doc.111230/e24475/getting_started.htm#autoId6


According to the above documentation (content extracted from there):


Creating an application results in the generation of the adfmf-application.xml file, which enables you to configure the mobile application and also the adfmf-features.xml file, which you use to add, remove, or edit the application features embedded within the mobile application.

hmmm... What do we get out of it? Is it clear what file is what?

We have both files generated when creating the application. Thats clear so far.

-Can we have more than one of those configuration files?

According to the following section of the documentation (content extracted from the below link) :

http://docs.oracle.com/cd/E35521_01/doc.111230/e24475/define_features.htm#CIHJCABB


An ADF Mobile application can have one or more view controller-type projects, each of which describes a set of features in an adfmf-feature.xml file. As described in Chapter 4, "Getting Started with ADF Mobile Application Development," ADF Mobile provides you with the adfmf-application.xml configuration file for the mobile application itself, and the adfmf-feature.xml file, which you use to define the content of the application. While you can manually change these files, ADF Mobile provides two overview editors that enable you to build these files declaratively.

..........


The adfmf-application.xml configuration file enables you to set the basic configuration of the ADF Mobile application by designating its display name, a unique application ID (to prevent naming collisions) and also by selecting the application features that will display on the application springboard (the equivalent of a home page on a smartphone). Further, this file enables you to create the user preferences pages for the mobile application.

Sorry what? We can have more than one ViewController type projects?
yep! Which means that we can have more than one adfmf-feature.xml files.

Lets do it then!!!!!!!!!!!!!!!!!! ( I actually typed all those !!!! one by one... Lets start a cult... the ! cult!. (exclamation mark cult.. sounds wicket.. doesnt it? )) ( I even placed the parenthesis correct!! wow imagine something like : " correct exclamation mark exclamation mark exclamation mark)

Lets create an ADF Mobile application with more than one ViewController type projects!
(If you dont remember how to start with and ADF Mobile application check the beginning of this  article)


In this example we will have 3 ViewController projects: ViewController, ViewController2 and ViewController3
The result of that creation is the following:


Ok, as we can see we have tree different adfmf-feature.xml files for each ViewController.
Lets create an html page in each ViewController:

in this post, names are going to be dull. There is something retro in this kind of naming.
The pages will be:

page.html
page2.html
page3.html

The result will be the following:


Each page will have an output text.. something to recognisable.

What have we done so far?
Nothing really.. we just created three html pages....
In order to show those pages in the application. we have to add them as features in the corresponding ViewController project.

NOTE: in each addition, make sure that the ids are unique. Keep the other values as default.


After all that is done, we will have the following:


What we have here?
We have created a feature for every html page in each ViewController. Each adfmf-feature.xml file is added as a feature reference in the adfmf-application.xml file.
Lets have a look:


As you can see, adfmf-application.xml has three entries. One for each feature. This was automatically done because we had the checkbox checked two screens ago ("add a corresponding feautre reference to adfmf-application.xml")

So what have we done so far?
Why dont we deploy to see for ourselves!!??

First we have to create a deployment profile for the iOS platform


Lets deploy to simulator now:


As you can see, each feature is displayed as a part of the navigationBar.. Yes that thing at the bottom of the screen is the navigationBar

-Can we remove the navigation Bar? Or at least can we control which feature is going to be displayed??

Yeap! 

This is configured in the adfmf-application.xml file descriptor. With simple declarative development!


So, with those two checkBoxes we control the NavigationBar.
And yes, you can configure which feature will be shown in your navigationBar!


-uhm.. Excuse me, sorry! You
-me?
-Yes you.. no not you, the guy next to you.
- there is only a dog next to me..
-The other side next to you...
-Be specific please..
-On your right
-It is still the dog..
-.... On your left please
-Who?? mee???
-YESS!!! you!
-what? how can I help you?

-What is spring board?
-Spring Board is the so called first wave of your astonishing application! Is the first screen your users will see!
Since it is that important.. you can choose how it can look like.. The below screen shows the default springBar


And the configuration is done in , you guessed it right!!! in the adfmf-application.xml


So what have we learned until now??

adfmf-application.xml is the file descriptor that holds the general behaviour of the application.

adfmf-feature.xml is the file descriptor that holds a feature that is going to be injected in the application.

We can have as many features as we want since it is not mandatory to be part of the application.

In simple words (literally)

1) Create your application (we are going to see more in the near future)
2) Create the feature
3) Add your pages( html etc..)
4) Include the feature in the adfmf-application.xml descriptor in order to be part of the application.


Well thats it for now. Another article is already on its way! We are going to try and answer all questions that might come up and hopefully we will have a better understanding


Regards,
Dimitrios.

Saturday, April 28, 2012

Having a non BC Drop Down Select component with list items From BC Data Control. ADF 11g

Hi,

in this example we are going to  create an application where we will have a drop down list where it's value is going to be stored to a managed Bean.

The list Source is going to be from a Data Control that comes from Business Components.
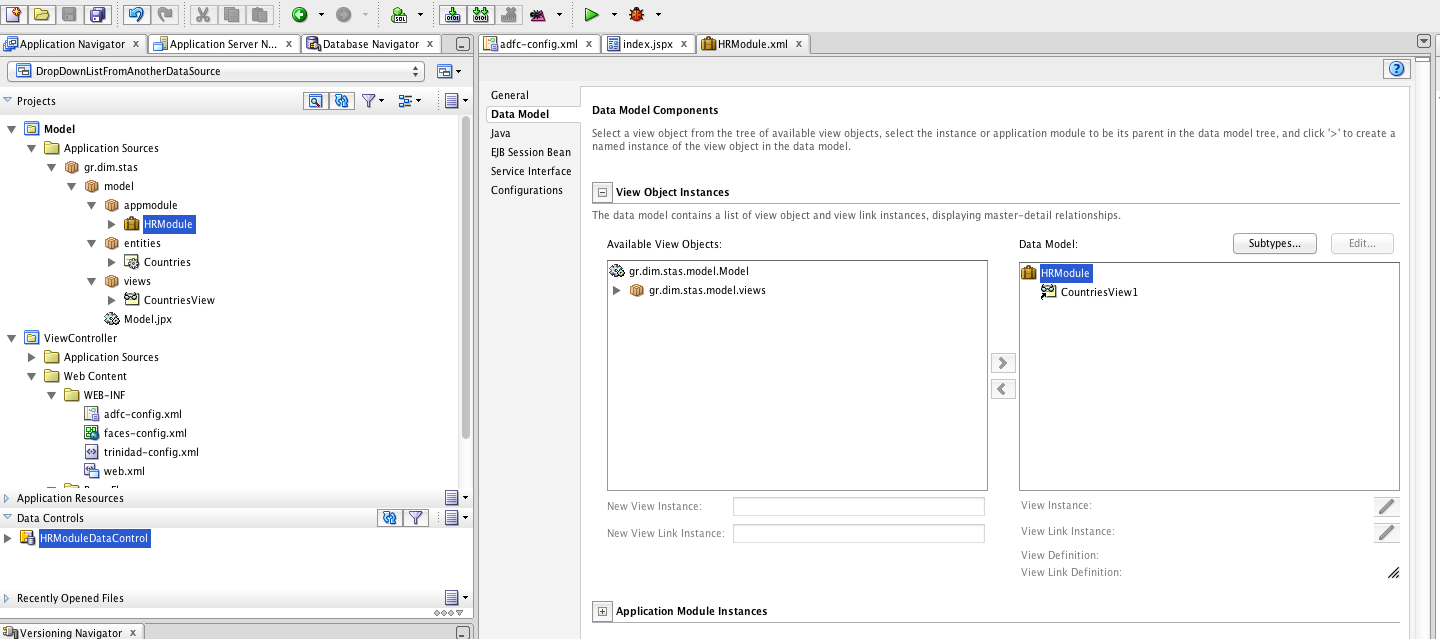
Countries for example, from HR Schema.

The goal here is to demonstrate that is possible to have a list of Values component that belongs to "a" DataControl(in our case, we are using a ManagedBean) and uses a list of possible values from another DataControl(In our case, HR Schema, Countries View Object).

Download Sample Application.

NOTE: in this post, we are going to follow another approach of explaining things...
We are going to follow the first thing that it might come in mind. Then we are going to think it over and see the simplicity of things. This is an experimental way of approaching a matter and covers the case where things are not that clear in our mind regarding the best approach to follow. Sometimes I find people accepting solutions "as is" without considering to challenge them. With this approach, we are going to rethink some approaches in order to determine which is the simplest and best. Make sure that you read until the end. We are all busy and we want the solution fast. But, trust me, there is more into it than just accepting the solution.


The case scenario here is pretty simple:

One attribute,
Hold the value in a ManagedBean,
Get the List of Possible Values from a View Object.
We simply create the Business Components:


An Empty Page:

Then, we will have to create the Select One choice Component

From the component palette in JDeveloper, we locate the Select One Choice component and we drop it into the page we created previously.


When we drag and drop it into the page, JDeveloper will show a dialog that will require the following information:

The first screen, requests us to determine whether this Select One Choice will have a binded list or a static list.


And of course, the common properties, such as the value holder.


(Lets think out loud a bit here)
We are dropping a select one choice into a page..
Where is the value held?? uh.. in a managed bean.. (in the example at least..)
-really?? where is that??
-uh.. we have to create it??
-YES! But why did not we do it before dropping the component?
-uh... we did not think that we havent finished with the "model" part..
-Yes, we are used to the bindings and we thought that everything will be generated automatically... Here it is not the case.. Alright, lets create a java class..

-what about this wizard? The one of the Select One Choice?
-Cancel it..
-Are we forgetting something??
-no! it's cool.. We got this, it is the java class missing.. the bean..
-ok.. (dont hold your breath just yet...)


Great,
now?
-now... now, we will place the setter and the getter to the Select One Choice component...
-ok.. so? how are we going to do it?
-Simple, we will add #{javaClass.lovValue} in the value property of  the Select One Choice.
-Are not we  forgetting something?
-uh..... no..
-ok.. lets proceed then..
-oh wait a minute! we are working with JDeveloper! lets do it declaratively!!
-yes! lets go.

Lets drop the Select One Choice once more..
(The same  procedure again.. If only we had thought of this earlier.. We would have solved several wizards and clicks..... anyway)

So, after doing the same process again, we select the value and expression builder:


a closer look:


-where is it??
-where is what???
-The bean..
-what bean?
-the bean!! the managed bean!! the javaClass we created! where is the bean!!! (oh... JDeveloper and it's wizards.. Declarative development they say.... what do they know.... I will put the EL on my own and everybody is going to be happy..


-Good.
-Uh.. I think we forgot something here...
- No we did not..
-Are you sure??
-yes yes.. We got this..
-ok... (....)
-press finish..


-It kind of looks weird.. Does not it?
-What do you mean?
-The Value has errors.. It is strange... maybe it something from the IDE wrong.. (As usual... somebody else's fault)

-WELL, it is not actually strange.... (do you remember inversion of control??)
-oooh... we have to set up the managed Bean... I totally forgot  about that!
-it happens..
-well actually, I was confused because with JDeveloper wizards produces everything by default when making actionListeners and valueChangeListeners...

-well yes.. but we should not forget the basic principals.. dont you think?

OK after setting the managed Beans:


There is no more errors, plus, we are able to see the bean in the wizard.. (Wizards, do know in the end.. )


OK.. everything seems to be ok..
-Lets Run The Page!!!!!

-are we ok with everything??
-yes yes!!
-Maybe it would be better to do a small recap before deploying and running the application..
-Lets see,

  • Generate BC: done.
  • Create java Class: done.
  • Declare it as a Managed Bean: done.
  • Drop the SOC into the page: done.
  • Map the Selected Items: OMG!!! we totally forgot about that!!!!!!! OMG! OMG!
  • map the value property:done..
-Ok.. Ok.. what do we do now? Do we drag and drop the SOC again? Do we do it everything from the beginning??
-no.
-But it is easier..
-yes. But we have to learn how to fix things..


-.....

lets open the page with and see the source code of the SOC (in the page select source tab):


What do we see here?
-We see that the select items is empty.. This is quite correct since, we, forgot to finish the JDeveloper wizard with all the needed values properly.
So, we have to do it manually now..

We have to know how to do it manually as well, simply because we have to. Wizards are good, but we really need to know what actually happens.

Ok. here is what we have to do:

  • Create a page Definition
  • Add a list in the page Definition
  • update the code of the SOC in the jspx


ok, the page Definition creation is very easy"
right click on the page and then  select Go To page Definition.. JDeveloper will tell you that there is no page Definition and will ask whether to create it or not. Create it of course. After that, we have an empty page Definition:


 Then, we have to add the list:

 Select the last option. All other options do not suit us, simply because, we do not navigate, we do not have any other Base Data Source to update:


After pressing ok, we have to declare the iterator that will fetch the list of values for this SOC:


 Then , we have to select a Display Attribute.
 The value of this attribute will be shown in the SOC. This is the value the user will see.


Press ok and we are done with the creation of the list. the pageDefintion code is now updated with the following:


Ok.
All we have to do now is to update the SOC with this list.
We locate the jspx and we view the source code. We locate the SOC and we change the value property of the f:selectItems components to:


For those of you rushing to say that there is no items property in the SOC. Look closer. 
The select items is a separate component. Further more, here is a screen with the declarative way:


Finally, we are done:


Download Sample Application.

Regards.

Wednesday, March 21, 2012

Search Form Results to Another Page. ADF BC 11g

Hi

In this example we are going to show how to implement a search Form and how to show  the results in another page.

Download Sample Application.

The scenario is fairly simple. We want to have our search form on one page and our results on another page.

Additionally, we want to navigate immediately  to the second page.

This means that our Find button, will take us in the results page.


We have two cases:

1) Having both pages in the same task flow

2) Having the pages in different task flows (no isolated Data Control.)

For this example we are going to use the HR schema and JDeveloper 11.1.1.6.0. We are going to use the Employees Table in this example.

BC:

Generating the Business Components is rather easy.

Just use the wizard:

Entities:

 Views:

 Application Module

 Application Module structure:


By now, we have a fully functional Model.

Next we are going to create the main page.
The main page will contain two Buttons:


  • SearchForm and Results to a different page in the same taskFlow
  • SearchForm and Results to a different page in different taskFlow


Here is the main page:


Next we are going to create the search Form task flow:

We are going to create a task flow called search-task-flow-definition. The search-task-flow-definition will contain one page, the search page. inside that page, we drag and drop the EmployeesView1 as a SearchForm, as shown below:


The search task flow diagram:

This is the implementation where the search and results take place in one task flow.

In the above picture, you will notice that the whole operation takes place in the same task flow.
The entry point is the search form page. Then it has the navigation, execute which will go to the execute method call that will, of course, execute the query with the appropriate parameters constructed by the search form. There are also general navigations that help the application work more smooth like search and change outcomes.  Nevermind those navigations.
The important thing here is to see the change that we did in the code.
Normally, after we dropped the iterator as a search Form, the Execute Button  has the following
ActionListener: #{bindings.Execute.execute}
In order to have the search results in another page by pressing the Execute button, we removed the actionListener and placed value to the Action property. So now the Execute button looks like the following:


So, the Execute button now, navigates to the method call, the method call is being executed and when finished, it navigates to the results page.
The results page is a simple page with a read only table. No operations are taking place in the results place.

Why did we do it like that? 
I know there are other solutions as well. But this one clears the picture better, at least to my understanding.
It has the steps more clear and more understandable. I think that with this way, many readers will  understand the status of the data and how it is kept from page to page in the same task flow.


The second case. The case where the results belong to another task flow.

Basically the principal here is the same. The only difference here is that with different task flows, we have the ability to choose, among other choices, between sharing  data controls with the calling task flow or not.  In this post we are going to keep things simple. We will accept the default values of the task flows and the data control will be shared. 
For that reason we are going to create a second task flow as shown in the screen below:


This task flow does the following:
The entry point is the Execute method call here.
Executes the iterator ( sounds funny... ) and then navigates to the results page.

So this means that this task flow will execute with any parameters values that are set in a search form.

uhh? What search form?? I do not see any search form here...

correct!!

The search form is now separated to another flow..

In this example, we  will not create another task flow for the search form. We are going to have it in the unbounded task flow of this application as shown below:


As you will see, the main page is decided to be the entry point. It has two navigations, depending on the preference of the implementation to test. The first navigation (searchInOneTaskFlow) takes the user to the one task flow that has all the implementation in it.
The second navigation(resultsInDifferentTaskFlow) takes the user to the search page which is inside the unbounded task flow, where the main page is, and from that page the Execute button calls the same outcome but the navigation now takes the user to another task flow.


And that is it!

Download Sample Application.

Regards.

Tuesday, March 20, 2012

ADF BC Getting started. How to Generate Business Components Using the JDeveloper wizard. ADF 11g.

Hi,

I just realized that  Google or any other search engine for that matter, is not giving any accurate links for the following searches:


How to Generate Business Components Using the JDeveloper wizard
or
How to Generate Business Components, ADF 11g

Go on, try it!
You will see that there is not a single, to the point, link in Google!

Strange, is not it?

Actually, I found a link in Bing search engine:

http://infotechinspiration.blogspot.com/2011/08/in-this-post-i-will-show-you-how-to.html

This is from Yahoo search engine:

http://jneelmani.blogspot.com/2009/02/11g-how-to-create-adf-business.html


There is also this link that came up in the first results in Google search engine:

http://docs.oracle.com/cd/E15051_01/web.1111/b31974/bcintro.htm

Which of course is the official documentation regarding Business Components. As you will see, it has a lot of useful information and a how to.

Well,
This is another post regarding the JDeveloper wizard and the generation of Business Component.
The aim of this post is to increase the links that actually teach the basics.
We need to be able to provide the Basics to all newcomers in the ADF BC world.

We have been blogging for years and years. Trying to provide help for really important development requests.
Giving this extra tip that will make the difference to our fellow ADF developers resolve any issues they might have.

But still, the basic help is hard to find over the internet, as you already saw above..

And here is the simple scenario:

Your manager asks you to " Document a way to generate Business Components for ADF 11g".

Hint: You do not know anything about ADF or its Business Components........

What do you do? You will search the Internet of course.. What are you going to type in the search input? Exactly what your Manager told you.
Why? because this is all you know! And worse, this is what your manager also knows.
The above sentence is the only clue!
We should not consider that newcomers know where to look for and how. There might always be the case where newcomers in ADF do not actually know JAVA or even programming.

So, lets put some detailed explanation here:


NOTE: this post is not going to replace the official documentation and should not be treated as that. This is an additional information that could be used for further reading.


The Software:

You need JDeveloper.

JDeveloper is the IDE that you need in order to use the wizards that will help proceed with the generation of Business Components.

Download JDeveloper from here:
http://www.oracle.com/technetwork/developer-tools/jdev/downloads/index.html

The version is not that important for now. The wizard is the same.
In this post we are using version 11.1.1.6.0
Choose your preferred operating system platform and download JDeveloper.

Then, you need to install JDeveloper 
This is pretty straightforward. Just accept the default setting for the time being. To run JDeveloper, simply locate the executable in the installation folder. In windows you will find it easier since it will be shown on your programs. In other platforms, look into the

middleware/home(or similar)/Jdeveloper/JDeveloper executable file


Then you need to have a working Database (We keep things simple)
In order to start working with JDeveloper and you do not have a connection to a database already, you can download the Oracle XE database. It will do just fine.
Download Oracle XE from the following link:

http://www.oracle.com/technetwork/products/express-edition/downloads/index.html
The setup is rather easy and straightforward.

In case you have problems installing the database, please refer here:
http://docs.oracle.com/cd/E17781_01/index.htm The documentation will guide you through the installation process. In case you havent noticed, the installation is only for Linux and Windows.
If you have a Mac as your development environment and you definitely want to install the db to your mac os, then you have to refer here:
http://www.oracle.com/technetwork/database/10204macsoft-x86-64-092720.html 

To me, a Virtual Box with a CentOS or Ubuntu is a cleaner approach. You can always go back to a snapshot!
For those of you who want to give it a try, please refer here:
https://www.virtualbox.org/


The Implementation:

First, start your engines!!
Start you Database, if not already started.
Start your JDeveloper.

The first screen of you JDeveloper:
(not including the tip of the day dialog)


To create a new Application, click on the New Application button on the left.


A new dialog will be shown

In the above dialog, you will be able to determine the type of the application you want to create. Select the  ADF application. It is usually the preselected option. 
With this way, JDeveloper know which templates to load in the process.

After selecting the type of the application. JDeveloper will guide you through the creation of two (2) projects: The Model and the ViewController. This is the default generation. 
With this way you will have two separate projects that will hold different information.  The Model will hold your business components  and the ViewController will hold your pages. (Simplified explanation I know, but it is more important to follow the principal in the beginning).

In this example we are going to follow the default values:

Model


press Next:
 press Next:

ViewController:
as you will see, different technologies will be added as libraries in this project:

press Next:


After reviewing what is about to be created, press Finish:


As you will see, we already have those two projects created in our application. If you expand the projects you will see what JDeveloper had created for us:


For those of you who already know JEE, you will be able to recognize some files for the web applications.

Furthermore, you will see that there is a new screen(tab) in our IDE. the title says:
Fusion Web Application Quick Start Checklist 

well, it is what it says..
This checklist is very very very very very helpful for beginners and we should not just close it.
We have a lot to learn from that checklist.

For instance, in our case, we want to see how to generate Business Components.
So we can directly jump to the corresponding checklist Build Business Services


If we expand it we will see the substeps:

click the substeps:


As you will see above, there is plenty documentation and how tos for almost every question you might have!

But since this is the overall documentation, we are going to present here a more compact way of generating Business Components.

Generating the Business Components:

Locate your Model project and right click on it:

select New:

In the new dialog, go to the Business Tier, click on ADF Business Components and on the right window of the dialog select Business Components from Tables:


click ok:
The next screen will request you to provide a connection to a database


Since this is our initial setup and this is our first project, we press the green plus icon:
A new dialog will be opened. This is the new connection dialog where we will provide information and credentials for this connection:


At this point as you will see, we have to know several information about our database:
This information will change from implementation to implementation.

This example uses Oracle XE in a Virtual Box with Ubuntu Linux. The schema targeted is the HR schema that comes with Oracle XE. Please use your database credentials, ip, port and SID.
If your are not familiar at all with Databases, you will have to do some reading. The goal of this post is not to teach DB  basic stuff.


Click OK:
We are being directed back to our initial dialog. The new dialog now has all the information from the newly created connection.


Click OK:
This next screen is the main screen in order to create the Entities.

NOTE:  the purpose of this post to illustrate the usage of the wizard regarding the generation of the Business Component. This post will not explain the meanings of the Business Components.


As you will see, we can filter the HR schema for the desired tables.


We are going to filter for employees:
When we press the Query button, we will see all the related Schema tables on the left side.
We  will select both tables and will shuttle them on the right panel;
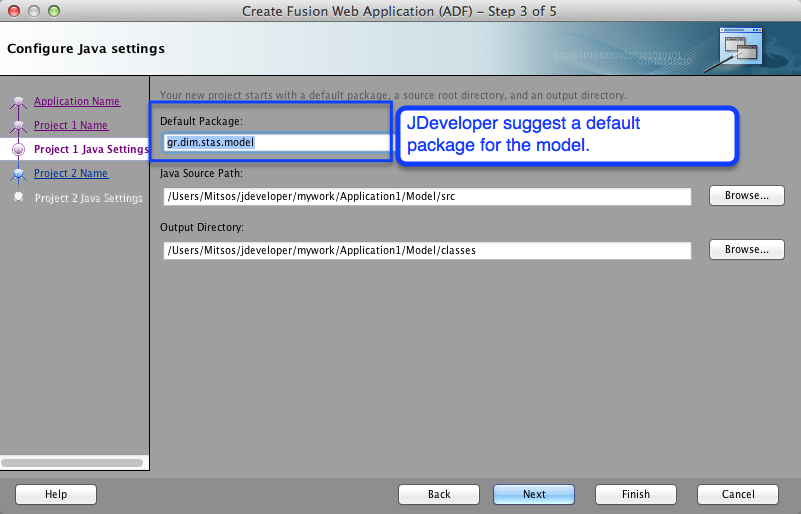
One important thing here is  the package. Make sure that you have entered the correct package.
The default is the one that we have declared for the Model project.


Click Next:
The next step is to define  which entities we want them to be View Objects.
Just imagine the View Objects as the collections of entity instances. One View Object has many entity instances.. (simplified I know.)
In the below screen, we have already changed the package and shuttled all the entities to be created as view objects. This steps actually asks  which Entities object will be included to View Objects.
So every entity will be included in one View Object. In other words, the wizard will produce as many view objects as the entities we shuttled on the right.

click Next:

The Next step will ask us of which Schema table are going to be used as read only View Objects.
Again, we have to take care of the package name. In the below screen we have filtered the Schema in order to get the Departments table.
Be careful here, this step will create View Objects based on Schema Tables and not Entity objects. In this step we are selecting tables and not entities.

click Next:
The next screen is referring to the Application Module. Think of the Application Module as the  Data Control of your View objects.
The application module will hold the instances of your view objects that will be used onto your pages(simplified description.) The Application Module will include your view objects.
In the below screen we have already changed the package and the name of the proposed name from the wizard.  The checkbox above is a flag that will "tell" the wizard to include all the view Object, that are about to be created here, to this application module.


Click Next:
Then next step in the wizard is the Business Components diagram. By default the wizard will not generate the diagram. But in this example we are going to generate it.
In order to generate the diagram we will check the first checkbox in the screen.
Then, we can change the package name, the name of the diagram, and we have the ability to choose what the diagram will include. For this example, we accept the default values.

Click Next:
The next screen is the last one that shows the summary before actually creating any business components.
As you will see, There is a list of the files that are going to be generated by the JDeveloper wizard.


Click Finish:
The wizard will generate all the appropriate files:


And that is it!!

We now have a fully functional model project!
Also note that we did not write a single line of code!

Regards.
Further reading:
http://www.oracle.com/technetwork/developer-tools/jdev/overview/index-100269.html
https://blogs.oracle.com/shay/entry/how_do_i_start_learning_oracle_adf_and_jdeveloper ( a very useful link that will help you a lot to start learning ADF)


LinkWithin

Related Posts Plugin for WordPress, Blogger...