Sunday, March 25, 2012

ADF Radio Group inside an af tree table through a transient attribute. LOV with static values. ADF BC 11g

Hi,

in this example we are going to show how to create a radio Group inside a table tree.

for this example we are going to show how easy it is to add an attribute as a single selection (Radio Group) inside a tree table.

In this example we are going to use the HR Schema and the following tables:

Departments and Employees.
JDeveloper 11.1.1.6.0.

Donwload Sample Application.

The case is simple. We will simply create a static LOV and we are going to attach it to a transient attribute that we will create in the Employees View Object.
The reason of this approach is to try just slightly different things.. :)

The Business Components created through JDeveloper Wizard


Next, we are going to create the static list of Values:


Then we are to create the attributes of this static LOV


Setting the primary key

 inserting the static data:


Then, we are going to assign this LOV to our transient attribute


Here we have a specific case. In order for the application to work properly, we have to have the transient attribute created to the Entity first and carried on to the View Object. I am planning to investigate on that, because it seems to me that having the transient attribute only on the View Object causes problems. I will come back with a separate post for this matter. But until I clarify things, lets just say that we create a transient attribute in the Entity and we added to our View Object.


Then, we map the attributes:


Next,  we change the UI hints for this LOV


Next, we update our pageDef in order to include the new transient attribute:


Update the page:


NOTE: in order to  add columns in a tree table, you have to add them on your own, Andrejus Baranovskis has published a post here.

The valuepassThru  option here is because we would have class cast exception in this example. It all depends on how you will create your LOV.

And that is pretty much it.

Download Sample Application.

Regards.

Wednesday, March 21, 2012

Search Form Results to Another Page. ADF BC 11g

Hi

In this example we are going to show how to implement a search Form and how to show  the results in another page.

Download Sample Application.

The scenario is fairly simple. We want to have our search form on one page and our results on another page.

Additionally, we want to navigate immediately  to the second page.

This means that our Find button, will take us in the results page.


We have two cases:

1) Having both pages in the same task flow

2) Having the pages in different task flows (no isolated Data Control.)

For this example we are going to use the HR schema and JDeveloper 11.1.1.6.0. We are going to use the Employees Table in this example.

BC:

Generating the Business Components is rather easy.

Just use the wizard:

Entities:

 Views:

 Application Module

 Application Module structure:


By now, we have a fully functional Model.

Next we are going to create the main page.
The main page will contain two Buttons:


  • SearchForm and Results to a different page in the same taskFlow
  • SearchForm and Results to a different page in different taskFlow


Here is the main page:


Next we are going to create the search Form task flow:

We are going to create a task flow called search-task-flow-definition. The search-task-flow-definition will contain one page, the search page. inside that page, we drag and drop the EmployeesView1 as a SearchForm, as shown below:


The search task flow diagram:

This is the implementation where the search and results take place in one task flow.

In the above picture, you will notice that the whole operation takes place in the same task flow.
The entry point is the search form page. Then it has the navigation, execute which will go to the execute method call that will, of course, execute the query with the appropriate parameters constructed by the search form. There are also general navigations that help the application work more smooth like search and change outcomes.  Nevermind those navigations.
The important thing here is to see the change that we did in the code.
Normally, after we dropped the iterator as a search Form, the Execute Button  has the following
ActionListener: #{bindings.Execute.execute}
In order to have the search results in another page by pressing the Execute button, we removed the actionListener and placed value to the Action property. So now the Execute button looks like the following:


So, the Execute button now, navigates to the method call, the method call is being executed and when finished, it navigates to the results page.
The results page is a simple page with a read only table. No operations are taking place in the results place.

Why did we do it like that? 
I know there are other solutions as well. But this one clears the picture better, at least to my understanding.
It has the steps more clear and more understandable. I think that with this way, many readers will  understand the status of the data and how it is kept from page to page in the same task flow.


The second case. The case where the results belong to another task flow.

Basically the principal here is the same. The only difference here is that with different task flows, we have the ability to choose, among other choices, between sharing  data controls with the calling task flow or not.  In this post we are going to keep things simple. We will accept the default values of the task flows and the data control will be shared. 
For that reason we are going to create a second task flow as shown in the screen below:


This task flow does the following:
The entry point is the Execute method call here.
Executes the iterator ( sounds funny... ) and then navigates to the results page.

So this means that this task flow will execute with any parameters values that are set in a search form.

uhh? What search form?? I do not see any search form here...

correct!!

The search form is now separated to another flow..

In this example, we  will not create another task flow for the search form. We are going to have it in the unbounded task flow of this application as shown below:


As you will see, the main page is decided to be the entry point. It has two navigations, depending on the preference of the implementation to test. The first navigation (searchInOneTaskFlow) takes the user to the one task flow that has all the implementation in it.
The second navigation(resultsInDifferentTaskFlow) takes the user to the search page which is inside the unbounded task flow, where the main page is, and from that page the Execute button calls the same outcome but the navigation now takes the user to another task flow.


And that is it!

Download Sample Application.

Regards.

Tuesday, March 20, 2012

ADF BC Getting started. How to Generate Business Components Using the JDeveloper wizard. ADF 11g.

Hi,

I just realized that  Google or any other search engine for that matter, is not giving any accurate links for the following searches:


How to Generate Business Components Using the JDeveloper wizard
or
How to Generate Business Components, ADF 11g

Go on, try it!
You will see that there is not a single, to the point, link in Google!

Strange, is not it?

Actually, I found a link in Bing search engine:

http://infotechinspiration.blogspot.com/2011/08/in-this-post-i-will-show-you-how-to.html

This is from Yahoo search engine:

http://jneelmani.blogspot.com/2009/02/11g-how-to-create-adf-business.html


There is also this link that came up in the first results in Google search engine:

http://docs.oracle.com/cd/E15051_01/web.1111/b31974/bcintro.htm

Which of course is the official documentation regarding Business Components. As you will see, it has a lot of useful information and a how to.

Well,
This is another post regarding the JDeveloper wizard and the generation of Business Component.
The aim of this post is to increase the links that actually teach the basics.
We need to be able to provide the Basics to all newcomers in the ADF BC world.

We have been blogging for years and years. Trying to provide help for really important development requests.
Giving this extra tip that will make the difference to our fellow ADF developers resolve any issues they might have.

But still, the basic help is hard to find over the internet, as you already saw above..

And here is the simple scenario:

Your manager asks you to " Document a way to generate Business Components for ADF 11g".

Hint: You do not know anything about ADF or its Business Components........

What do you do? You will search the Internet of course.. What are you going to type in the search input? Exactly what your Manager told you.
Why? because this is all you know! And worse, this is what your manager also knows.
The above sentence is the only clue!
We should not consider that newcomers know where to look for and how. There might always be the case where newcomers in ADF do not actually know JAVA or even programming.

So, lets put some detailed explanation here:


NOTE: this post is not going to replace the official documentation and should not be treated as that. This is an additional information that could be used for further reading.


The Software:

You need JDeveloper.

JDeveloper is the IDE that you need in order to use the wizards that will help proceed with the generation of Business Components.

Download JDeveloper from here:
http://www.oracle.com/technetwork/developer-tools/jdev/downloads/index.html

The version is not that important for now. The wizard is the same.
In this post we are using version 11.1.1.6.0
Choose your preferred operating system platform and download JDeveloper.

Then, you need to install JDeveloper 
This is pretty straightforward. Just accept the default setting for the time being. To run JDeveloper, simply locate the executable in the installation folder. In windows you will find it easier since it will be shown on your programs. In other platforms, look into the

middleware/home(or similar)/Jdeveloper/JDeveloper executable file


Then you need to have a working Database (We keep things simple)
In order to start working with JDeveloper and you do not have a connection to a database already, you can download the Oracle XE database. It will do just fine.
Download Oracle XE from the following link:

http://www.oracle.com/technetwork/products/express-edition/downloads/index.html
The setup is rather easy and straightforward.

In case you have problems installing the database, please refer here:
http://docs.oracle.com/cd/E17781_01/index.htm The documentation will guide you through the installation process. In case you havent noticed, the installation is only for Linux and Windows.
If you have a Mac as your development environment and you definitely want to install the db to your mac os, then you have to refer here:
http://www.oracle.com/technetwork/database/10204macsoft-x86-64-092720.html 

To me, a Virtual Box with a CentOS or Ubuntu is a cleaner approach. You can always go back to a snapshot!
For those of you who want to give it a try, please refer here:
https://www.virtualbox.org/


The Implementation:

First, start your engines!!
Start you Database, if not already started.
Start your JDeveloper.

The first screen of you JDeveloper:
(not including the tip of the day dialog)


To create a new Application, click on the New Application button on the left.


A new dialog will be shown

In the above dialog, you will be able to determine the type of the application you want to create. Select the  ADF application. It is usually the preselected option. 
With this way, JDeveloper know which templates to load in the process.

After selecting the type of the application. JDeveloper will guide you through the creation of two (2) projects: The Model and the ViewController. This is the default generation. 
With this way you will have two separate projects that will hold different information.  The Model will hold your business components  and the ViewController will hold your pages. (Simplified explanation I know, but it is more important to follow the principal in the beginning).

In this example we are going to follow the default values:

Model


press Next:
 press Next:

ViewController:
as you will see, different technologies will be added as libraries in this project:

press Next:


After reviewing what is about to be created, press Finish:


As you will see, we already have those two projects created in our application. If you expand the projects you will see what JDeveloper had created for us:


For those of you who already know JEE, you will be able to recognize some files for the web applications.

Furthermore, you will see that there is a new screen(tab) in our IDE. the title says:
Fusion Web Application Quick Start Checklist 

well, it is what it says..
This checklist is very very very very very helpful for beginners and we should not just close it.
We have a lot to learn from that checklist.

For instance, in our case, we want to see how to generate Business Components.
So we can directly jump to the corresponding checklist Build Business Services


If we expand it we will see the substeps:

click the substeps:


As you will see above, there is plenty documentation and how tos for almost every question you might have!

But since this is the overall documentation, we are going to present here a more compact way of generating Business Components.

Generating the Business Components:

Locate your Model project and right click on it:

select New:

In the new dialog, go to the Business Tier, click on ADF Business Components and on the right window of the dialog select Business Components from Tables:


click ok:
The next screen will request you to provide a connection to a database


Since this is our initial setup and this is our first project, we press the green plus icon:
A new dialog will be opened. This is the new connection dialog where we will provide information and credentials for this connection:


At this point as you will see, we have to know several information about our database:
This information will change from implementation to implementation.

This example uses Oracle XE in a Virtual Box with Ubuntu Linux. The schema targeted is the HR schema that comes with Oracle XE. Please use your database credentials, ip, port and SID.
If your are not familiar at all with Databases, you will have to do some reading. The goal of this post is not to teach DB  basic stuff.


Click OK:
We are being directed back to our initial dialog. The new dialog now has all the information from the newly created connection.


Click OK:
This next screen is the main screen in order to create the Entities.

NOTE:  the purpose of this post to illustrate the usage of the wizard regarding the generation of the Business Component. This post will not explain the meanings of the Business Components.


As you will see, we can filter the HR schema for the desired tables.


We are going to filter for employees:
When we press the Query button, we will see all the related Schema tables on the left side.
We  will select both tables and will shuttle them on the right panel;
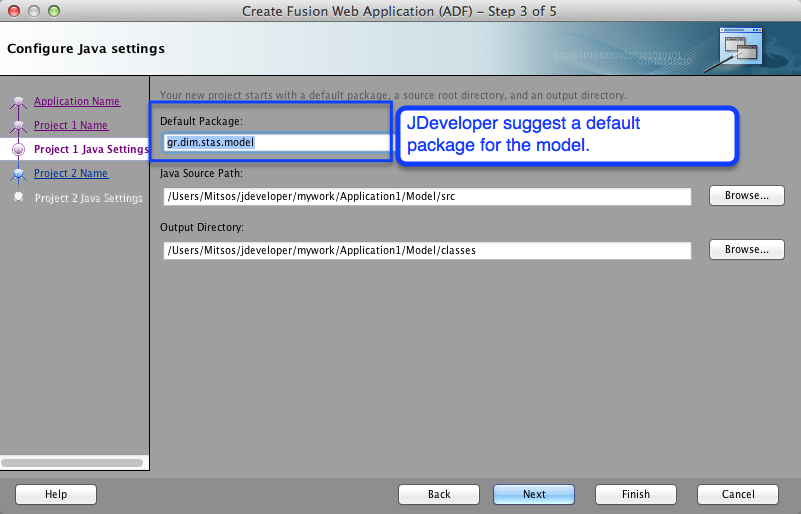
One important thing here is  the package. Make sure that you have entered the correct package.
The default is the one that we have declared for the Model project.


Click Next:
The next step is to define  which entities we want them to be View Objects.
Just imagine the View Objects as the collections of entity instances. One View Object has many entity instances.. (simplified I know.)
In the below screen, we have already changed the package and shuttled all the entities to be created as view objects. This steps actually asks  which Entities object will be included to View Objects.
So every entity will be included in one View Object. In other words, the wizard will produce as many view objects as the entities we shuttled on the right.

click Next:

The Next step will ask us of which Schema table are going to be used as read only View Objects.
Again, we have to take care of the package name. In the below screen we have filtered the Schema in order to get the Departments table.
Be careful here, this step will create View Objects based on Schema Tables and not Entity objects. In this step we are selecting tables and not entities.

click Next:
The next screen is referring to the Application Module. Think of the Application Module as the  Data Control of your View objects.
The application module will hold the instances of your view objects that will be used onto your pages(simplified description.) The Application Module will include your view objects.
In the below screen we have already changed the package and the name of the proposed name from the wizard.  The checkbox above is a flag that will "tell" the wizard to include all the view Object, that are about to be created here, to this application module.


Click Next:
Then next step in the wizard is the Business Components diagram. By default the wizard will not generate the diagram. But in this example we are going to generate it.
In order to generate the diagram we will check the first checkbox in the screen.
Then, we can change the package name, the name of the diagram, and we have the ability to choose what the diagram will include. For this example, we accept the default values.

Click Next:
The next screen is the last one that shows the summary before actually creating any business components.
As you will see, There is a list of the files that are going to be generated by the JDeveloper wizard.


Click Finish:
The wizard will generate all the appropriate files:


And that is it!!

We now have a fully functional model project!
Also note that we did not write a single line of code!

Regards.
Further reading:
http://www.oracle.com/technetwork/developer-tools/jdev/overview/index-100269.html
https://blogs.oracle.com/shay/entry/how_do_i_start_learning_oracle_adf_and_jdeveloper ( a very useful link that will help you a lot to start learning ADF)


Sunday, March 18, 2012

af:serverListener and af:clientListener usage. Prevent User input to an input text component while an operation of another component is in progress. No glasspane, no splash screens. ADF 11g

Hi,

In this example we are going to create a small application that will demonstrate the following scenario:

We are going to have a radio Group and an InputText.


We are going to prevent the user from entering any value to inputText while the operation from the radioGroup is ongoing.

Download Sample Application.

In order to keep things simple and demonstrate the usage regardless the services behind, we are not going to have any  Business Components in this example.

Requirement:
We want to prevent users from editing the input text field while the operation of the radioGroup is ongoing.


Basically is not only that. We want to show to the user that there is an operation going on. But we do not want to show any popup ups or grey out the whole screen.

why?
Simply because our operation might take less time than the time needed to show a popup in our screen.
For example, it might take 1 to 1,5 seconds. So, if we were to use a popup, The second it would be shown, it will have to hide itself again..

Not very convenient is it? I know..

So for that reason, we are going to think it over a bit..


NOTE: in this post, we are going to follow another approach of explaining things...
We are going to follow the first thing that it might come in mind. Then we are going to think it over and see the simplicity of things. This is an experimental way of approaching a matter and covers the case where things are not that clear in our mind regarding the best approach to follow. Sometimes I find people accepting solutions "as is" without considering to challenge them. With this approach, we are going to rethink some approaches in order to determine which is the simplest and best. Make sure that you read until the end. We are all busy and we want the solution fast. But, trust me, there is more into it than just accepting the solution.


What can we do out of the box:


Well, we can have a af:clientListener to the radioGroup, in order to invoke  evt.preventUserInput(); through a javascript method.


Ok, so far, our main issue is resolved.. the user is not able to change any data to our inputText component..

But the user, is not a software engineer (at least in this fictional scenario..) and thus, she/he is not able to understand the phrase:


"you are not able to insert any data or change for that second, because you have changed the radioGroup choice  and this might take a few seconds to finish the operation. For that reason we block you from making any changes. Furthermore, if you had made any changes, those changes, will be lost because we are refreshing the input Text for several reason that are not so important to you right now."

"oh.. ok.. "

(she/he is going to forget it if she/he will not work on it for a month.. Then we will have the same discussion again.)

In order to avoid this rather unpleasant discussion, we have to make some indication in the application that there is an operation going on and the user is not able to make any changes..

I know!! we have the status indicator! It is easy to implement, fast to implement, it does not get any better than this!! This is the one! It is out of the box! a simple drag and drop! and viola!!

Well, this is a good thought!... But how are we going to apply this?

We will drag and drop it next to the input text.. Is it so difficult to understand that? It is easy, I can show you if you have difficulties in understanding the meaning of drag and drop...

Yeah sure.. lets arrange a meeting for that.. :)

What I am trying to say here is, that status indicator is good but does not indicate that the user is not able to make any changes to the components.

That is why a lot of implementations are applying the popup behavior, it is an indication that there is a process going on and the user is not able to make any changes to the application data nor able to press any other buttons.

I see, but if we are going to make the users understand that they cannot touch this ( have a break hit the link.. there are a lot of things going on in your head every day... I have 2 gold fish in an aquarium.. they do not remember anything for more than a second.. you cant blame them.. how many things can go through their heads..! :)   hammer time! watch the video.. )


Ok, so, what should we do?

.... (thinking)...
....(thinking)...
....(taking a zip of morning's coffee and rethinking)...
...( I need to throw away that coffee)...
...(thinking)...

I know!!
We will disable the input component!! (Do not hold your breath just yet... we are still thinking here)

Yee! Now we are talking.. Lets have a new cup of coffee.. and start developing..

WAIT!

 take a light coffee.. it is getting late..

Yes. We shall prevail!!

Disable the component. ok.  I still have some questions though..


  • How are we going to disable it?
  • When are going to disable it?
  • For How long are we going to disable it??
  • Is there is a way to re-enable it??
One thing at a time..

How are we going to disable it?

Can we do it in the javascript function? something like component.setDisabled(true) or something??
Well, no.
Why not?
Well, those properties are secured and are specially treated. Please see the relevant post of Frank Nimphius here

In short (please read the article above), we cannot just disable our input component, unless we will unsecure it. We do not want to unsecure it. We will try to find another way. Remember, we just want to make sure that the user understands that she/he cannot change anything while the process is ongoing.

oh.. I see. So, what can we do?  Cant we just cancel the event and proceed with the disabling the component. Yes we could. But this would also cancel the new value setting.

What we want is to, disable the input text, proceed with everything the radioGroup has to do and when this everying is done.. we want to enable back the input text.


OK, we could do the following: We could cancel the event, invoke the serverListener and do the setting there! Then we will enable it! All in one method!! (Do not just jump around now... We are still thinking here...).  So basically, we are going to do all in one method right? Right! But how are going to do that? We want to refresh the UI somewhere in between....

Oh.. Actually yes.. we want to:


  • Disable
  • process the process
  • Enable
Hmm... If we are going to do everything in one java method, how are we going to have this interaction with the UI?

Maybe we could invoke some javascript from the java method and then maybe we could invoke something else there.... (think of the maintenance here...)


It is already complicated as it is..  Dont you think?

Perhaps it is time to start rethinking here..


Rethinking

Let us see what we have here: We need to understand what to do and when.

First of all, we have realized that disabling the input text is not that easy as our initial thought... Especially with our case where we want to jump around, disable, process, enable and generally do funky stuff in our UI..

So perhaps we could take things slow..

Lets see our approach:

We are going to use an af:clientListener with a valueChange type in our RadioGroup. We are going to do this because we want to use a javascript method and "do something with the inputText". This javascript method is additionally going to prevent the user from any input as long as the operation in in progress. Then, we are going to use an af:serverListener and we are going to "undo that something that we did to the inputText" The  serverListener is going to be invoked via the  AdfCustomEvent.queue method. This method is going to be called from the clientListener java function.

Regarding the "do something with the inputText" We could start as a first implementation to hide it and after the process to make it visible.


Lets see what we can do with the component:
  • We can find it by id
  • We could hide it immediately.  Simply by calling component.setVisible(true) in our javascirpt method.
  • We could call a java method in our bean in order to show it again. Why should we make this last part? Simply because we will have to wait for the whole process to finish and go again into the Render_Response phase where the component will be refreshed through the partial trigger and it will be visible again. For those that are going to argue 

Simple is not it?

Lets see the amount of code we are going to write for this first implementation:

JavaScript:


Is not much right?

page Code:


As you will see the code is fair simple.


Java Code:


This is just the server Listener method.

At this point.. we are ready for our initial thought.

If you run this first implementation you will see that the input component is hidden while the process is there and becomes visible when it is done.

Why is this happening just like that?

Well, the clientListener is hiding the inputText. This is javascript and happens immediately.
Then, the clientListener is calling the serverListener method which in turn changes the visible property of the inputText.
This change is "visible" to the user after the refresh part that happens with the partial trigger.
It does not actually matters if the AdfCustomEvent  takes place first or last. After all, is a visibility change.

Yeah that is great! But what about the Disable part? We still want to disable the component as long as the operation lasts.

Well, given the fact that we cannot set the property from the javascript method, it adds up a complexity by itself. Furthermore, to unsecure the component is not a recommended approach. Thus, we will have to find other ways of making sure the user understands that the component is blocked for a time being.

Visibility is something that can work very well and with the minimum effort of development.
Now, if you want you can still "play" with this property and show/hide additional components.

For example, we could hide the inputText and show another component, lets say an output text that would have a small message. In the serverListener method we then just switch back the visibility properties.


To me, the visibility property is something that can be used in many ways and is rather easy to be applied.

Download Sample Application.

Regards.

References:
http://www.oracle.com/technetwork/developer-tools/jdev/1-2011-javascript-302460.pdf
https://blogs.oracle.com/jdevotnharvest/entry/using_af_serverlistener_as_a
http://docs.oracle.com/cd/E15523_01/apirefs.1111/e12046/oracle/adf/view/js/component/AdfUIComponent.html
http://docs.oracle.com/cd/E17904_01/apirefs.1111/e12419/tagdoc/af_serverListener.html
http://docs.oracle.com/cd/E12839_01/apirefs.1111/e12046/oracle/adf/view/js/component/rich/input/AdfRichInputText.html#getReadOnly__


LinkWithin

Related Posts Plugin for WordPress, Blogger...