Friday, April 5, 2013

Lucky 11.1.1.7.0 JDeveloper (aka 11g ps6) is here.

I just feel part of the happy community to welcome the new version of JDeveloper !!


You can download it from here
http://www.oracle.com/technetwork/developer-tools/jdev/downloads/jdeveloper11117-1917330.html

Andrejus Baranovskis has already mentioned in his blog, table pagination is back!
http://andrejusb.blogspot.in/2013/04/adf-11g-ps6-adf-10g-table-pagination.html

Timo Hahn has already pointed out to beware about the layout container
http://tompeez.wordpress.com/2013/04/03/jdev-11-1-1-7-0-table-pagination-beware-of-the-layout-container/ 


Lucas Jellema demostrated the treeMap component
http://technology.amis.nl/2013/04/02/adf-dvt-using-the-tree-map-visualization-component-to-compare-relative-sizes-and-distributions/ 


Shay Schmeltzer demonstrated the usage of sunburst component
https://blogs.oracle.com/shay/entry/working_with_the_sunburst_adf


 Chris Muir explains why we should upgrade to this new version:
https://blogs.oracle.com/onesizedoesntfitall/entry/not_how_but_why_should

Personally I havent developed anything yet, but I know I will start using it for the two following reason alone!

CSS3 (Skyros skin)
Table Pagination!

Here you can find the known issues:
http://www.oracle.com/technetwork/developer-tools/jdev/default-1399172.html

and here are the bug fixes
http://www.oracle.com/technetwork/developer-tools/jdev/index-088099.html#11gR1Patchset6%2811.1.1.7.0%29NewFeatures-BugFixList

Regards.


Wednesday, April 3, 2013

Maven Deploy to Oracle Weblogic. Step By Step. The Basics. Part 2/4

Hi,
This is a series of  four (4) articles that will describe how to use Maven and deploy a sample application to Weblogic.

Contents of each part:

There are no assumptions here and we are going to do everything from scratch.

There is always a person out there that will have to use those technologies together without knowing any of them.

So far, we have learned about Maven, what it is, and what is it's role in this task of ours. We understand that we have to create a Mavnen project and by using Maven we wil deploy our sample applications to Weblogic. But we dont know what weblogic is and how do we use it..


Weblogic

What is Weblogic?? Well, Weblogic is a lot of things.. In our case, we are talking about Weblogic Server. So, what is Weblogic Server?
According to Oracle's web site ( content extracted from http://www.oracle.com/technetwork/middleware/weblogic/overview/index.html )

....
Oracle WebLogic Server 12c is the industry's best application server for building and deploying enterprise Java EE applications with support for new features for lowering cost of operations, improving performance, enhancing scalability and supporting the Oracle Applications portfolio.
....
Okay... so what is an application server??
According to TSS (content extracted from http://www.theserverside.com/news/1363671/What-is-an-App-Server)
an application server provides an environment where applications can run, no matter what the applications are or what they do.

Furthermore, the JAVA EE 6 tutorial says (content extracted from http://docs.oracle.com/javaee/6/tutorial/doc/bnabo.html )

 ...

Container Services

Containers are the interface between a component and the low-level platform-specific functionality that supports the component. Before it can be executed, a web, enterprise bean, or application client component must be assembled into a Java EE module and deployed into its container.
The assembly process involves specifying container settings for each component in the Java EE application and for the Java EE application itself. Container settings customize the underlying support provided by the Java EE server, including such services as security, transaction management, Java Naming and Directory Interface (JNDI) API lookups, and remote connectivity. Here are some of the highlights.
  • The Java EE security model lets you configure a web component or enterprise bean so that system resources are accessed only by authorized users.
  • The Java EE transaction model lets you specify relationships among methods that make up a single transaction so that all methods in one transaction are treated as a single unit.
  • JNDI lookup services provide a unified interface to multiple naming and directory services in the enterprise so that application components can access these services.
  • The Java EE remote connectivity model manages low-level communications between clients and enterprise beans. After an enterprise bean is created, a client invokes methods on it as if it were in the same virtual machine.
Because the Java EE architecture provides configurable services, application components within the same Java EE application can behave differently based on where they are deployed. For example, an enterprise bean can have security settings that allow it a certain level of access to database data in one production environment and another level of database access in another production environment.
The container also manages nonconfigurable services, such as enterprise bean and servlet lifecycles, database connection resource pooling, data persistence, and access to the Java EE platform APIs (see Java EE 6 APIs).

Container Types

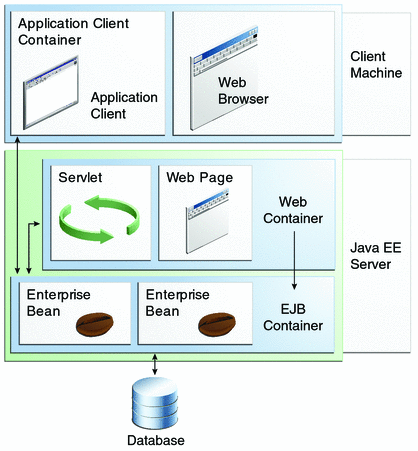
The deployment process installs Java EE application components in the Java EE containers as illustrated in Figure 1-5.

Figure 1-5 Java EE Server and Containers
Diagram of client-server communication showing servlets and web pages in the web tier and enterprise beans in the business tier.
  • Java EE server: The runtime portion of a Java EE product. A Java EE server provides EJB and web containers.
  • Enterprise JavaBeans (EJB) container: Manages the execution of enterprise beans for Java EE applications. Enterprise beans and their container run on the Java EE server.
  • Web container: Manages the execution of web pages, servlets, and some EJB components for Java EE applications. Web components and their container run on the Java EE server.
  • Application client container: Manages the execution of application client components. Application clients and their container run on the client.
  • Applet container: Manages the execution of applets. Consists of a web browser and Java Plug-in running on the client together.

 And in order to be fully covered ( content extracted from http://docs.oracle.com/cd/E24329_01/web.1211/e24446/intro.htm#sthref6 )

The WebLogic Server complete implementation of the Java EE 6.0 specification provides a standard set of APIs for creating distributed Java applications that can access a wide variety of services, such as databases, messaging services, and connections to external enterprise systems. End-user clients access these applications using Web browser clients or Java clients. It also supports the Spring Framework, a programming model for Java applications which provides an alternative to aspects of the Java EE model. See Programming Models.

So, in a nutshell, Weblogic Server, is a container for JEE applications. It holds our JEE applications and we can access them by making requests to it (Weblogic Server that is.)
All we have to do is to deploy our application to Weblogic!

This article is not going to fully explain the architecture of Weblogic and it certainly does not itend to cover every aspect of it. Furthermore, it is not in the intention of this article to replace the official documentation. This article aims to introduce Weblogic to the reader and provide enough information and knowledge in order to finish the aforementioned task of deploying a sample application to weblogic using Maven.


Weblogic works with domains. What? yes. domains. What is a domain?
According to the official documentation ( content extracted from http://docs.oracle.com/cd/E24329_01/web.1211/e24446/domains.htm#INTRO173 )
An Oracle WebLogic Server administration domain is a logically related group of Oracle WebLogic Server resources. Domains include a special Oracle WebLogic Server instance called the Administration Server, which is the central point from which you configure and manage all resources in the domain. Usually, you configure a domain to include additional Oracle WebLogic Server instances called Managed Servers. You deploy Web applications, EJBs, Web services, and other resources onto the Managed Servers and use the Administration Server for configuration and management purposes only.

And yes! you thought correct! We have to have a domain to deploy our JEE application.

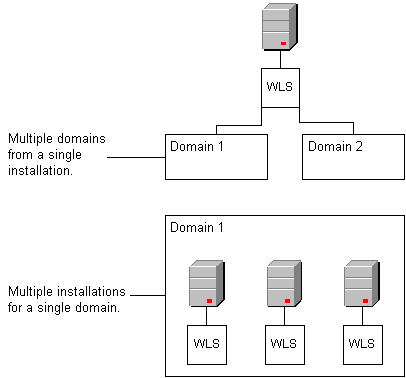
Can we have more than one domain? YES! we can!
here is a very elaborative diagram from the official documentation (image copied from http://docs.oracle.com/cd/E24329_01/web.1211/e24446/domains.htm#INTRO173 )


You see that you deside your structure and you deside how many domains you want. As simple as that. In our case, we only need on domain and no managed servers.

Getting Weblogic.

You can download Weblogic from the following link
http://www.oracle.com/technetwork/middleware/weblogic/downloads/index.html

Download your favorite version if you want. We will be using the latest  version at the time of this writting which is 12c (12.1.1). Since our example is rather basic, I dont think that you will face any issues with previous versions.

Installing Weblogic
The official documentation does an excellent job describing all the installation steps:
http://docs.oracle.com/cd/E24329_01/doc.1211/e24492/guimode.htm#i1082009
Without trying to copy paste the entire official documentation here xD I am extracting a sample of it as it seems to be the most common approach:
To start the installation program in graphical mode on a Windows platform, follow these steps.
  1. Log in to the Windows system.
  2. Go to the directory that contains the installation program.
  3. Double-click the installation file.
    For example, the name of the installation program for the WebLogic Server Package installer for Windows 32-bit is wls1036_win32.exe.
    The installation program begins to install the software.
See Installation Screens for a description of each installation program screen.

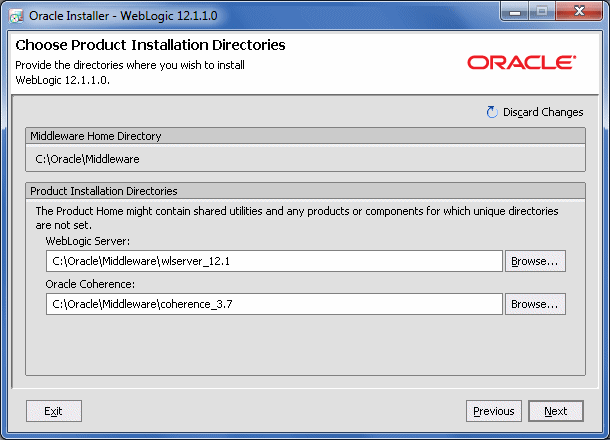
As you will see, it a pretty straightforward wizard that almost everything for you. All you have to do is define the jdk to be use and the Middleware home.

Note down the middleware home path! ( we will need it in later parts of this article )
(this image was taken from the official documentation.)


Once Weblogic is installed, we have to create a domain.

Creating a domain
Usually, when you are finished with the weblogic installation a new dialog is shown asking you if you want to configure your weblogic among other options. Even if you chose to close that window, you can still create a domain. Just follow the official instructions (content copied from http://docs.oracle.com/cd/E24329_01/web.1211/e24499/newdom.htm#WLDCW111 )

  • To start the Configuration Wizard in graphical mode on a Windows platform, choose Start > Programs > Oracle WebLogic > WebLogic Server > Tools > Configuration Wizard.
  • To start the Configuration Wizard in graphical mode from a Windows command prompt or on UNIX systems:
    1. Log in to the system on which the product is installed.
    2. Open an MS-DOS command prompt window (on Windows) or a command shell (on UNIX).
    3. Go to the following directory:
      On Windows: WLHOME\common\bin
      On UNIX: WLHOME/common/bin
      where WLHOME is the directory in which WebLogic Server is installed.
    4. Execute the following command:
      On Windows: config.cmd
      On UNIX: sh config.sh

      Note:
      When you run the config.cmd or config.sh command, the following error message might be displayed to indicate that the default cache directory is not valid:
      *sys-package-mgr*: can't create package cache dir
      You can change the cache directory by including the -Dpython.cachedir=valid_directory option in the command line.
      The Welcome screen is displayed.


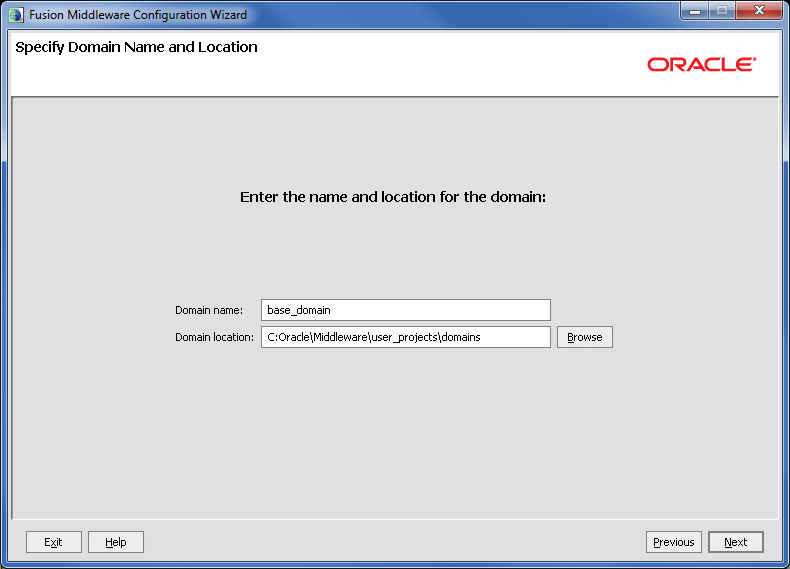
When asked for a domain name, place whatever you prefer but note it down because we are going to need it later on.
For the sake of this example, the name of the domain is base_domain
(image taken from http://docs.oracle.com/cd/E24329_01/web.1211/e24499/configuration_screens.htm#CIHHDFJJ )


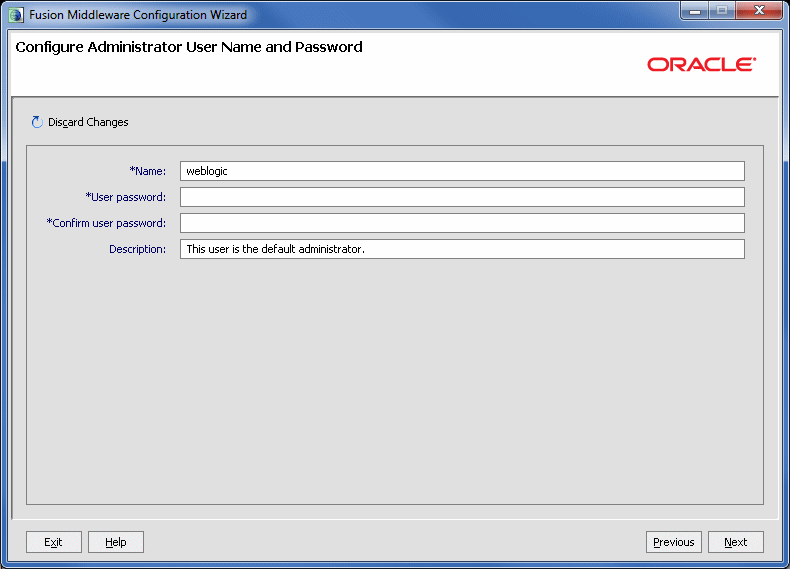
Another important step is the administrator user name and password. This is important since you will be using those credentials to administer the domain. So when you reach the following step, make sure that you remember the username and password! For the sake of this example we use weblogic / welcome1


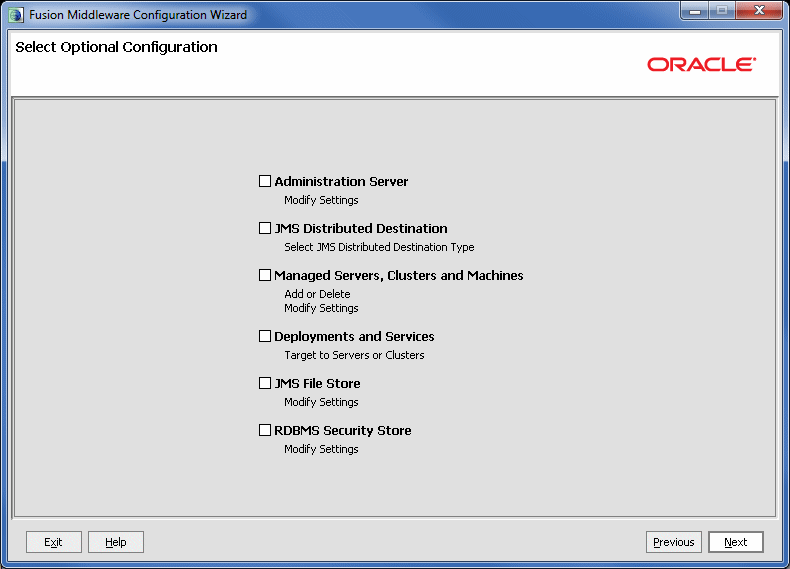
Note that we do not need any managed servers or clustering for this example. No JDBC  datasources or something similar. Just a simple domain.
So when you reach this step (image taken from http://docs.oracle.com/cd/E24329_01/web.1211/e24499/configuration_screens.htm#CIHBICAA )


Leave everything unselected. We dont need them for this example.

After you finish the wizard, you have a new domain!! hooray!!

Start and Stop the domain
Now it is time to start the domain you have previously created.
Starting:
According to the official documentation
http://docs.oracle.com/cd/E24329_01/web.1211/e21048/startquickref.htm#i1052773
WL_HOME\samples\domains\medrec\bin\startWebLogic.cmd (Windows)

WL_HOME is the installation path of weblogic. That is, the path you chose to install weblogic in the previous steps.
After WL_HOME follows the path that leads to the .cmd script that starts the admin server.
In this example the path is the following:

C:\Oracle\Middleware\wls1211\user_projects\domains\base_domain\bin\startWeblogic.cmd

The simplest way to call the script would be through a cmd prompt.  open a cmd prompt and go to the folder of the script and just call it. This will start your admin server of your domain.

There is another way of starting your domain. Through the start menu.
Depending on your windows version, you will be able to navigate to the same script call from the start menu. The installation has took care of everything and added the appropriate links for you.
So in your start menu you will be able to see something like the following:


Stopping:

It is exactly the same process but with different script.
C:\Oracle\Middleware\wls1211\user_projects\domains\base_domain\bin\stopWeblogic.cmd
As you see in the above img, you already have the related link.
However there is an additional way.  Just go to the cmd window that runs the server process and simply press ctr+c . This will kill the running process on the cmd window and it will stop the server.

That is all about weblogic for now!
Next step, lets create a sample application using Maven.

Maven Deploy to Oracle Weblogic. Step By Step. The Basics. Part 4/4

Hi,
This is a series of  four (4) articles that will describe how to use Maven and deploy a sample application to Weblogic.

Contents of each part:

There are no assumptions here and we are going to do everything from scratch.

There is always a person out there that will have to use those technologies together without knowing any of them.

So Far
Up to this point, we spent some time trying to get acquainted with various stuff.. We learned about Maven.. we learned about Weblogic, we learned a bit about Netbeans and we have created two maven projects.

Aaand.. at this final part of this series.. we are going to deploy our maven applications to our weblogic server.

Everything is setup and all we have to do is a few more steps.

Remember when we talked about Maven is using plugins?
Well, this is what we have to do, use a plugin that will help us deploy our maven application.
But which plugin?

Oracle provides a way in doing things

http://docs.oracle.com/cd/E24329_01/web.1211/e24368/maven.htm

 ....
  • wls-maven-plugin—Delivered in WebLogic Server 12c, provides enhanced functionality to install, start and stop servers, create domains, execute WLST scripts, and compile and deploy applications. In addition to its shortened, easier to specify name, the extended functionality in the wls-maven-plugin requires a local WebLogic Server installation, in contrast to the weblogic-maven-plugin, which is generated as a standalone, self-contained JAR file. However, with the wls-maven-plugin, you can install WebLogic Server from within your Maven environment to fulfill the local WebLogic Server requirement. For more information about this plug-in, see Configuring the WebLogic Development Maven Plug-In..
.....

So we understand that Weblogic 12c already provides the maven plugin for us.

All we have to do is to install  that plugin to our repository.
Locate the plugin and the pom.xml 
According to the documentation

(http://docs.oracle.com/cd/E24329_01/web.1211/e24368/maven.htm)
The wls-maven-plugin is located in the MW_HOME/wlserver_12.1/server/lib directory, where MW_HOME represents the top-level installation directory for all Fusion Middleware products installed on one machine; for example, c:\Oracle\Middleware. The plug-in is provided as a pre-built JAR file and accompanying pom.xml file:
  • MW_HOME/wlserver_12.1/server/lib/wls-maven-plugin.jar
  • MW_HOME/wlserver_12.1/server/lib/pom.xml


In our case (for this example):

C:\Oracle\Middleware\wls1211\wlserver_12.1\server\lib\wls-maven-plugin.jar
C:\Oracle\Middleware\wls1211\wlserver_12.1\server\lib\pom.xml

Now that we have located them. Lets install it.
Open a command prompt and navigate to  C:\Oracle\Middleware\wls1211\wlserver_12.1\server\lib\ (or your middleware home\wlserver_12.1\server\lib)


Next, execute the following command

mvn install -Dfile=wls-maven-plugin.jar -DpomFile=pom.xml

Normally you will see a BUILD SUCCESS at the end.

In case you dont remember what mvn install  is and what it does, check out this link
http://maven.apache.org/plugins/maven-install-plugin/

According to the official documentation:
is used to automatically install the project's main artifact (the JAR, WAR or EAR), its POM and any attached artifacts (sources, javadoc, etc) produced by a particular project.

Next, you have to call the install-file goal in order to place the files in the proper place in the local repository (
as the documentation says here: http://maven.apache.org/guides/mini/guide-3rd-party-jars-local.html)

mvn install:install-file -Dfile=wls-maven-plugin.jar -DpomFile=pom.xml
 Normally you will see a BUILD SUCCESS at the end. 
 
The above goal, will set up everything properly for us. So what we have done so far is:

We installed the project's main artifact, which is the wls-maven-plugin, and we then setup everything properly to our local repository.

How do we know that? How do we know that we have done everything ok?
First of all, we have just added a new plugin into our local repository. How do we call it?
Where is it installed?

It is easy to find, if you paid attention to the install:install-file


ok so we know where is the plugin, under com.oracle.weblogic. But how do we call the plugin's goals?

with the following command:

mvn com.oracle.weblogic:wls-maven-plugin:help
 

Now, that is a bit long, isnt it? It would be great if we could do something like the following:
mvn wls:help ? right? It certainly looks better and easier to remember.
In order to do that we have to do   two things:

1) Assign a prefix to our plugin. But wait! this is already done by Oracle. As you remember there is a pom.xml in the lib folder


So this means that we can skip the wls-maven-plugin part and type simply wls.
More on the plugin prefixes:
http://maven.apache.org/guides/introduction/introduction-to-plugin-prefix-mapping.html


2) Map the prefix to a pluginGroup for wls. In order to have it working, we have to map the new prefix to a pluginGroup. In our case, it is com.oracle.weblogic.  We create the pluginGroup in the settings.xml of our m2 folder. In my case, it is
C:\Users\Dimitrios\.m2\settings.xml

As you can see, we have now added a pluginGroup that will help us work with our prefix.

Lets try now the following:

mvn wls:help
 Nice isnt it?? If everything went well, it will print you the list of goals of this plugin followed by a BUILD SUCCESS.

How to Use it.
We have done the learning..
We have done the setup
We have done the configuration

Let us now make it all work together!

First things first. We have to include our new plugin (wls) in our maven application.
In order to do that, we have to edit the pom.xml file in each of our applications.

In both cases we have to add the following:
 
                com.oracle.weblogic
                wls-maven-plugin
                12.1.1.0


CmdMvnApp pom.xml (no IDE app): 


Then go to cmd line and navigate to the location of the pom.xml of the project and type

mvn package

NetbeansMvnApp pom.xml (Netbeans app):


Build the Project:


Next step is to deploy! right?
wrong.. Why? simply because,  we have to answer some logical questions..

-Where are we going to deploy the application?
hmm... you didnt see that coming right?
Wait wait wait... according to the official documentation:
http://docs.oracle.com/cd/E24329_01/web.1211/e24368/maven.htm#autoId2

The wls-maven-plugin follows the Maven theme and uses a convention-over-configuration approach. Thus, for a set of commonly used configuration elements, the plug-in supplies an appropriate, consistent set of default values that you can use across all of the goals. This reduces the degree of configuration required for you to use the plug-in and helps you to achieve uniform goal executions, even in different environments. The common configuration elements and their default values are:
  • middlewareHome: ${basedir}/Oracle/Software, where ${basedir} is the standard Maven project property which represents the directory containing the current Maven project.
  • weblogicHome: wlserver or wlserver_12.1 depending on the install type.
  • domainHome: ${basedir}/Oracle/Domains
  • source: ${project.build.directory}/${project.artifactId}.${project.packaging}
  • adminurl: t3://localhost:7001
Now, according to this, we should be able to deploy just like that. Right? Wrong..
-=Why do you keep saying wrong all the time!!!!
ok. just try it then.

I will!
mvn wls:deploy


Hmmm.. something went wrong...
No kidding..
A few questions first..
Why did we use the wls:deploy ?
Founded it here:
http://docs.oracle.com/cd/E24329_01/web.1211/e24368/maven.htm#autoId3


Deploys WebLogic Server applications and modules. Supports all deployment formats; for example, WAR, JAR, and such
 
Oh ok.

So based on that, lets start the server then..

mvn wls:start-server
hmmmm... still the same error..
Ofcourse it is the same error!!
Read carefully:
middlewareHome: ${basedir}/Oracle/Software, where ${basedir} is the standard Maven project property which represents the directory containing the current Maven project.

Is there any chance (in this series of articles) to have your Middlware home inside the Maven project?

Right. So. we have to set the proper middlware home value and probably more values prior to deploying.

Lets focus on starting the Weblogic Server 12c with Maven.
For the sace of this example, we are going to use some parameters of the start-server goal as described in the official documentation.
http://docs.oracle.com/cd/E24329_01/web.1211/e24368/maven.htm#autoId12 

Ok, so we see in the above link that we have to configure several parameters prior to starting the weblogic server. In order to do that, we have to configure our Maven weblogic plugin with the appropriate values.

Configuring the Maven plugin is fairly easy. Here is a refresher
http://maven.apache.org/guides/mini/guide-configuring-plugins.html#Configuring_Parameters

So in this example, the following configuration will be enough to start the server:


Now, go ahead and type mvn wls:start-server (remember that you are executing a command from within the Maven project folder where the pom.xml resides.)

After a few seconds you will the following message:

Server started successful
Now, go and test your console. Go to a browser and type localhost:7001/console (or whatever your ip and port)


Tadaaaa!!
Nice isnt it??
Hang on!
What?
What if I do it again?
What do you mean?
What if I type the same command again! Will I crash it???
Nope:


See?? All good. I am sure you can change the maven plugin configuration in order to be able to stop the weblogic server.

Gonfiguration for deployment.
We will update the current configuration in order to be able to deploy our application onto Weblogic (expecially now that we have it up and running!!). Hopefully by now, you will not need to read further and you will be able to make the adjustments on your own.
However, here is the configuration.


On the Command Line type mvn wls:deploy
 and thats it!


So here we are! we managed to deploy our application from the command line using Maven!!!

Now, in order to finalize this series, we are going to do the same with Netbeans.
First we update the pom.xml of the NetbeansMvnApp as the previous one (CmdMvnApp)
Next, we have to create a goal in NetBeans for this project:


And thas it!
This will deploy the application onto Weblogic!


It wasnt that hard! was it??

Of course there are many other goals to configure such as re-deploy, stop-server etc. But I am pretty sure that it will be straightforward from now on!
Still confused?
Start Over!
Regards.


Maven Deploy to Oracle Weblogic. Step By Step. The Basics. Part 3/4

Hi,
This is a series of  four (4) articles that will describe how to use Maven and deploy a sample application to Weblogic.

Contents of each part:

There are no assumptions here and we are going to do everything from scratch.

There is always a person out there that will have to use those technologies together without knowing any of them.

So far we have learned about Maven and Weblogic. So far we have no connection between those two tools.
In this article, we are going to create our applications using mvn in three ways.
One with the cmd prompt by executing  maven commands.
One using Netbeans 7.3

In case you need a small refresher about Maven and the general idea behind it, jump to Part 1 before continuing.

 In our case, we are going to keep things quite simple. We are just going to use a java web application with one jsp saying Hello World! Nothing more.
As mentioned earlier, we are going to create three projects in three different ways.

Maven command line.
In order to create a new project, first make sure that you have maven installed. On a Windows machine, open the command prompt and type mvn --version
If everything is ok, you will something similar to this:

Apache Maven 3.0.5 (r01de14724cdef164cd33c7c8c2fe155faf9602da; 2013-02-19 13:51:
28+0000)
....

Next, using the command line, navigate to a folder (or create one..) that will store our sample projects.
In this example we are going to use the following path
C:\Users\Dimitrios\mavenToWeblogic>
 Now we are ready to fly!

 As we found out in part one, Maven has plugins with goals. Additionally, we create Maven based projects. But how?

Archetype plugin comes to play.
According to the official documentation
(content extracted from http://maven.apache.org/guides/introduction/introduction-to-archetypes.html )

In short, Archetype is a Maven project templating toolkit. An archetype is defined as an original pattern or model from which all other things of the same kind are made. The names fits as we are trying to provide a system that provides a consistent means of generating Maven projects. Archetype will help authors create Maven project templates for users, and provides users with the means to generate parameterized versions of those project templates.
........
You may want to standardize J2EE development within your organization so you may want to provide archetypes for EJBs, or WARs, or for your web services. Once these archetypes are created and deployed in your organization's repository they are available for use by all developers within your organization.


 As you can see, the Archetype plugin helps us create maven project based on some predefined templates. In other words, it creates the project for us with a specific structure. This is very helpful when it comes to large application where a lot of projects have to be created.

Can we create our own archetypes?
Yes we can.

Are we going to create our own archetype?
No we wont. But here is the official documentation http://maven.apache.org/guides/mini/guide-creating-archetypes.html

Why not? We dont itend to replace the official documentation here.. We just learn what we need to perform our task which is to deploy a maven application to weblogic using maven.

Maven has a long list of archetypes. In order to see that list type the following on your command prompt:

mvn archetype:generate

First you will see that maven is downloading the archetype plugin and then is resolving any dependences for that plugin and goal. Next it is going to print a very long list of archetypes. At the end, it will ask you to choose which one you want to use.
Sure, you can go through the list and pick one, as you see it has a default one with number 254.
For more information check:
http://maven.apache.org/archetype/maven-archetype-plugin/usage.html

In our case, we want to create a webapp.  Since we already have a very long list of archetypes, how are we going to find the correct number?
One way is to  find the right number from the list.
 Another way is to re-filter the list by providing some keywords. Instead of number, try typing
archetype-webapp and hit enter.

The above will narrow down the list. However most probably you will see more than one options. The one we are looking for is:

 remote -> org.apache.maven.archetypes:maven-archetype-webapp (An archetype
which contains a sample Maven Webapp project.)
So, hit the number you see for that option, or, re-filter it by typing
maven-archetype-webapp  and hit enter.

This will give only one option with number 1.
Type 1 and hit enter.

Next you will be asked for the version of the archetype.
 Choose the latest stable one.
 By the time of this writting, 1.0 was the latest version.
Type the number of the option and hit enter.


Next, the process will ask you to specify a groupId.

What is a groupId?
According to the official documenation
( From http://maven.apache.org/guides/getting-started/index.html#How_do_I_make_my_first_Maven_project )
groupId This element indicates the unique identifier of the organization or group that created the project. The groupId is one of the key identifiers of a project and is typically based on the fully qualified domain name of your organization. For example org.apache.maven.plugins is the designated groupId for all Maven plug-ins.

( From  http://maven.apache.org/pom.html )
groupId: This is generally unique amongst an organization or a project. For example, all core Maven artifacts do (well, should) live under the groupId org.apache.maven. Group ID's do not necessarily use the dot notation, for example, the junit project. Note that the dot-notated groupId does not have to correspond to the package structure that the project contains. It is, however, a good practice to follow. When stored within a repository, the group acts much like the Java packaging structure does in an operating system. The dots are replaced by OS specific directory separators (such as '/' in Unix) which becomes a relative directory structure from the base repository. In the example given, the org.codehaus.mojo group lives within the directory $M2_REPO/org/codehaus/mojo.

So in other words, we have to provide a unique name for our organization.
Since this is an example, we have an example organization.

Type com.organization.example and hit enter.

After that is done, the process asks for an artifactId

What is an artifactId?
Well, according to the official documentation
(from http://maven.apache.org/guides/getting-started/index.html#How_do_I_make_my_first_Maven_project )
artifactId This element indicates the unique base name of the primary artifact being generated by this project. The primary artifact for a project is typically a JAR file. Secondary artifacts like source bundles also use the artifactId as part of their final name. A typical artifact produced by Maven would have the form -. (for example, myapp-1.0.jar).
(from maven.apache.org/pom.html )
artifactId: The artifactId is generally the name that the project is known by. Although the groupId is important, people within the group will rarely mention the groupId in discussion (they are often all be the same ID, such as the Codehaus Mojo project groupId: org.codehaus.mojo). It, along with the groupId, create a key that separates this project from every other project in the world (at least, it should :) ). Along with the groupId, the artifactId fully defines the artifact's living quarters within the repository. In the case of the above project, my-project lives in $M2_REPO/org/codehaus/mojo/my-project.

So in our case,  the artifact will be:
CmdMvnApp . Hit enter.

Next, the process will ask you for the version of the project. Since this is an example, we can leave it as is.
Just hit enter,

Next, the process will ask you for the package.

The screen already defines the default value of the package option.


 the package value is optional and  it represents
Next, it shows a list with our options for confirmation:


Hit Enter to proceed.

Maven will create the project and it will notify us upon completion.


And thats it!! We have just created a Maven application from the command line!!
If you go and check your mavenToWeblogic folder(or the name you have specified) you will see that we have a new folder called CmdMvnApp.

The important stuff.
As you have alreay noticed, inside our new application, there is a file called pom.xml

What is a pom.xml ?
According to the official documentation
(from http://maven.apache.org/pom.html#What_is_the_POM )
POM stands for "Project Object Model". It is an XML representation of a Maven project held in a file named pom.xml. When in the presence of Maven folks, speaking of a project is speaking in the philosophical sense, beyond a mere collection of files containing code. A project contains configuration files, as well as the developers involved and the roles they play, the defect tracking system, the organization and licenses, the URL of where the project lives, the project's dependencies, and all of the other little pieces that come into play to give code life. It is a one-stop-shop for all things concerning the project. In fact, in the Maven world, a project need not contain any code at all, merely a pom.xml.
So in a nutshell: The POM holds the information of our project. It holds the dependencies, the plugins to be used etc..

Let see what our pom file has so far. if you open it with your preffered editor, you will something like the folowing:


You can easily identify the values we have set a while back during our command line process.
Furhtermore, you will see that Maven has added a dependency without asking us. That is the dependency of JUnit for unit testing.
Maven strongly believes that we should do some unit testing!
In case you never heard of JUnit, have a look here
http://junit.org/


We are not going to dive to unit testing in the article since it is out of scope. But I highly encourage you to use it if you havent done already. It will free your mind and your code!

What have we done so far? We have create a full java web app!!!
Congratulations!
We wont be doing anything else in this part of the article. The kinky details are comming up in the next and final part of this series.

Doing the same thing with Netbeans 7.3
We are going to do the same thing with Netbeans 7.3. We will create a new maven application.

Get Netbeans 7.3
Netbeans 7.3 is the latest  version at the time of this writting.. feel free to get the latest version
http://netbeans.org/downloads/
You could start with the JEE version..

Installation is pretty straightforward. Just call the executable. And the wizard is pretty simple.
As soon as you have your Netbeans installed, start it!

Netbeans comes with a bundled version of Maven. Since we have already installed Maven on our machine, it would be good to use that version.

Go to tools->options, select JAVA and then select Maven tab:


 OK. now we have the same Maven version on Netbeans.

Let create the maven application!

Then, select file-> new project.
You will see a dialog where you will get to choose the type of the project:


and guess what! we want a java web app!
hit next


It looks shinny doesnt it?

I am sure you can spot the artifactId, groupId and so on. One thing to notice here is the difference in the default package netbeans provides. It adds up the artifactId in the package suggestion. You can leave it as is if you want. I have removed the ending part just to make a difference. xD

hit next.

Then it will ask you to use a server. Leave it balnk. No server selected.
hit finish.

Thats it!

We now have bright new maven application.


As you can see, Netbeans produces a bit longer pom.xml file with more dependencies and plugins.

The bottom line is that, we have another web app!

We wont be dealing with the details of the pom.xml for the time being as it will lead to full blown book and we dont want that!

That is about it!

Lets go now to the final part of this series where put everything together and we deploy our applications using Maven:
http://dstas.blogspot.com/2013/04/maven-toweblogic-part4.html


Maven Deploy to Oracle Weblogic. Step By Step. The Basics. Part 1/4

Hi,
This is a series of  four (4) articles that will describe how to use Maven and deploy a sample application to Weblogic.

Contents of each part:

There are no assumptions here and we are going to do everything from scratch.

There is always a person out there that will have to use those technologies together without knowing any of them.

Maven 
What is Maven? Well, the official documentation says the following:

Maven, a Yiddish word meaning accumulator of knowledge, was originally started as an attempt to simplify the build processes in the Jakarta Turbine project. There were several projects each with their own Ant build files that were all slightly different and JARs were checked into CVS. We wanted a standard way to build the projects, a clear definition of what the project consisted of, an easy way to publish project information and a way to share JARs across several projects.
The result is a tool that can now be used for building and managing any Java-based project. We hope that we have created something that will make the day-to-day work of Java developers easier and generally help with the comprehension of any Java-based project.

http://maven.apache.org/what-is-maven.html

In other words and this is how it helps me remember it,  maven is a repository that holds the dependencies your project needs. Not only that, but you can include your projects in the repository and you can reuse them as dependencies to other projects.

The above is not perfect and certainly does not cover everything, but it provides the general idea.

So, whats with the repositories?  Well, a repository is a place where all your dependencies are stored. According to the official documentation (content extracted from http://maven.apache.org/guides/introduction/introduction-to-dependency-mechanism.html):
Dependency management is one of the features of Maven that is best known to users and is one of the areas where Maven excels. There is not much difficulty in managing dependencies for a single a project, but when you start getting into dealing with multi-module projects and applications that consist of tens or hundreds of modules this is where Maven can help you a great deal in maintaining a high degree of control and stability.

For example:
Lets say that you want a new house.. right? So you want a new house. The new house is your project.
But, a new house has more needs to be implemented, some of them are the following:
money, builders, mortgages, partner's approval and so on..
Each of those needs is called a dependency and each dependency has more needs (dependencies) 
With Maven, most of those dependencies are resolved automagicaly through the repositories! (except the partner of course...  :) )

In a more complex example where we would have to have 15 different houses. Your project now is to build 15 different houses. Maven would take care of the dependencies! Lets say we want a villa, a flat, a house and a two bed appartment and so on (use your imagination). As you can imagine, each house depends on different things.. This is where Maven comes to play.. It knows about those dependencies for every type of house and resolves them automatically. Additionally, we can provide more dependencies for each house depending on our taste! Maven will determine the dependencies of the new dependency and everything will be great and we will live happily ever after!
Well, there are cases where Maven cannot resolve all the dependencies and we will have to do it on our own..  but even in this case, things are quite simple.

I wish my life was that simple! xD

Again, this is not the definitive guide for Maven and it is not going to be. This article will give the general idea of Maven by describing some of it's key features in order to help complete our task which is to deploy a sample application to WebLogic, using Maven.

Maven needs JAVA. Since Maven is built for java applications you need to have java  in order to install and run Maven.


Maven creates Maven Projects. Yes, that is true.. with Maven you create a Maven project that has specific structure and is ready to be configured. So you can create a Maven project for a java application or for java web application or for java enterprise application etc and  you are ready to start developing.
How do you do that and why should you do that? The how is easy, by executing specific goals! (comming up, look below). Maven uses plugins and goals that really help in creating project structures based on conventions. So you dont have to worry much about


Maven has goals. Maven  works with goals. Each goal or a set of goals can serve a specific purpose. Imagine goals as a part of a bigger process. We can have standalone goals and we can have goals that depend on other goals. For example, a goal called test  of the SureFile plugin(comming up, look below) can be used to run unit tests. The create goal of the archetype plugin can be used to create a maven project. 


Maven has plugins. Anyone can create maven plugins. A plugin is a set of goals (look above) that serve a specific purpose. For example, the following link describes the SureFire plugin
http://maven.apache.org/surefire/maven-surefire-plugin/
As you will see in the link, SureFire has only one goal called test .
This is how SureFile plugin is designed. It has only one goal. So, we can call that goal of that plugin and it will do it's job. Of course plugins can and quite often do, accept configuration parameters. Those parameters determine the execution process of the plugin's goals. We wont dive into the details of configuration parameters since it is out of scope of this article. It is enough to know that plugin goals accept configuration parameters that can determine their execution process.


Maven has phases. Maven has a list of phases. That list is called build lifecycle. From the official documentation (content extracted from http://maven.apache.org/guides/introduction/introduction-to-the-lifecycle.html), we can see the default lifecycle phases:

  • validate - validate the project is correct and all necessary information is available
  • compile - compile the source code of the project
  • test - test the compiled source code using a suitable unit testing framework. These tests should not require the code be packaged or deployed
  • package - take the compiled code and package it in its distributable format, such as a JAR.
  • integration-test - process and deploy the package if necessary into an environment where integration tests can be run
  • verify - run any checks to verify the package is valid and meets quality criteria
  • install - install the package into the local repository, for use as a dependency in other projects locally
  • deploy - done in an integration or release environment, copies the final package to the remote repository for sharing with other developers and projects.
a more detailed information on the lifecycle phases can be found here:
http://maven.apache.org/guides/introduction/introduction-to-the-lifecycle.html#Lifecycle_Reference

Why do we need to know about those lifecycle phases? Simply because those phases will help us understand how to use Maven when we will deploy our project to weblogic.

The basic thing to remember here is that we can call any phase we want knowing that all previous phases will be executed prior the one we want. So for instance,  if we call  compile phase, we know that validate phase will be called prior compile  phase.


Installing Maven on Windows
Before installing Maven, make sure that you have installed JAVA (JDK to be exact since JRE will not be enough).
http://www.oracle.com/technetwork/java/index.html

To install Maven is fairly easy..  Download it from here: http://maven.apache.org/download.cgi
On the same page, it describes how to install it on windows. The below content is extracted from the official url:
  1. Unzip the distribution archive, i.e. apache-maven-3.0.5-bin.zip to the directory you wish to install Maven 3.0.5. These instructions assume you chose C:\Program Files\Apache Software Foundation. The subdirectory apache-maven-3.0.5 will be created from the archive.
  2. Add the M2_HOME environment variable by opening up the system properties (WinKey + Pause), selecting the "Advanced" tab, and the "Environment Variables" button, then adding the M2_HOME variable in the user variables with the value C:\Program Files\Apache Software Foundation\apache-maven-3.0.5. Be sure to omit any quotation marks around the path even if it contains spaces. Note: For Maven   2.0.9, also be sure that the M2_HOME doesn't have a '\' as last character.
  3. In the same dialog, add the M2 environment variable in the user variables with the value %M2_HOME%\bin.
  4. Optional: In the same dialog, add the MAVEN_OPTS environment variable in the user variables to specify JVM properties, e.g. the value -Xms256m -Xmx512m. This environment variable can be used to supply extra options to Maven.
  5. In the same dialog, update/create the Path environment variable in the user variables and prepend the value %M2% to add Maven available in the command line.
  6. In the same dialog, make sure that JAVA_HOME exists in your user variables or in the system variables and it is set to the location of your JDK, e.g. C:\Program Files\Java\jdk1.5.0_02 and that %JAVA_HOME%\bin is in your Path environment variable.
  7. Open a new command prompt (Winkey + R then type cmd) and run mvn --version to verify that it is correctly installed.
In a nutshell, after installing Maven, we have to setup some user environment variables to have it working on our Windows machine.
The most important part is t number 5:

In the same dialog, update/create the Path environment variable in the user variables and prepend the value %M2% to add Maven available in the command line.

And there you go! you have an accumulator of knowledge on your Windows machine!
If you want to learn more about maven and discover it's power, I strongly recomend the official documentation of maven along with the great books out there.
By now, we have a very basic understanding of what is Maven and it can do for us. We havent created any maven project yet simply because we are going to to do in Part 3  of this series. Why not now? Because I want you to try it on your own and see how is it is! If you are so eager to see how it is done, jump to part 3 here

The Next Part (part 2) of this series is about Weblogic .

References:
http://maven.apache.org/guides/getting-started/maven-in-five-minutes.html
http://maven.apache.org/guides/introduction/introduction-to-the-lifecycle.html
http://maven.apache.org/archetype/maven-archetype-plugin/
http://shop.oreilly.com/product/9780596517335.do
http://maven.apache.org/plugins/index.html
http://code.google.com/hosting/search?q=maven+plugin+label%3Amaven&projectsearch=Search+Projects 
http://maven.apache.org/guides/mini/guide-configuring-plugins.html
http://maven.apache.org/guides/introduction/introduction-to-dependency-mechanism.html


LinkWithin

Related Posts Plugin for WordPress, Blogger...