Saturday, December 17, 2011

TaskFlow managed Bean properties.Referring to a Bean instance from another Bean instance using task flows. ADF 11g

Hi,
In this example we are going to show how to access bean instances from other bean instances using task flows.
Based on a question in the OTN forum:
https://forums.oracle.com/forums/thread.jspa?threadID=2321268&tstart=0

It might sound a bit strange to some, but task flows can be quite helpful for that matter.

Download Sample Application.

What is the purpose of task flows?

According to documentation:
http://docs.oracle.com/cd/E24382_01/web.1112/e16182/taskflows.htm#BABFBAFA

ADF task flows provide a modular approach for defining control flow in a Fusion web application.


Among other things, Task Flows provide the ability to instantiate beans with the appropriate scope.


According to documentation:


http://docs.oracle.com/cd/E24382_01/web.1112/e16182/web_getstarted.htm#CACCFIII


In an application that uses ADF data binding and ADF task flows, managed beans are registered in different configuration files from those used for a standard JSF application. In a standard JSF application, managed beans are registered in the faces-config.xml configuration file. In a Fusion web application, managed beans can be registered in the faces-config.xml file, the adfc-config.xml file, or a task flow definition file. Which configuration file you use to register a managed bean depends on what will need to access that bean, whether or not it needs to be customized at runtime, what the bean's scope is, and in what order all the beans in the application need to be instantiated.

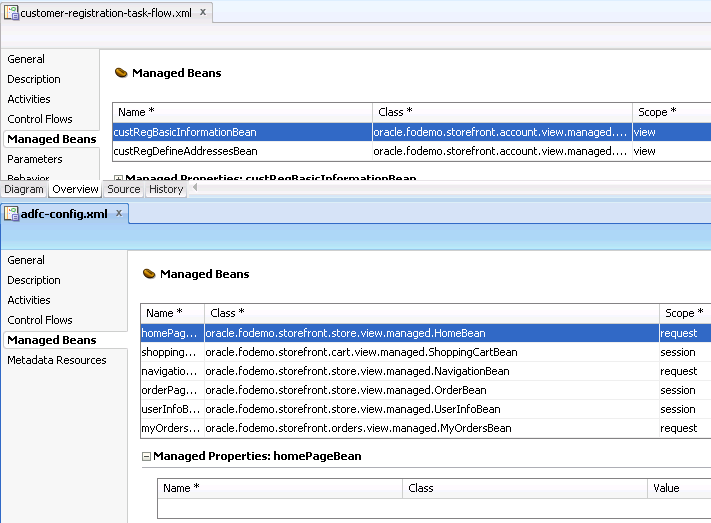
So, basically, this means that, we can declare managed beans with a specific scope per taskFlow.
If you check the documentation's  images regarding task flows and managed beans:


You will notice that each managed Bean has it's own properties.

This gives us the ability to create, as declarative as possible, connections between instances of beans.

This of course needs an understanding of the bean scopes in order to have a proper implementation.
Here is the documentation about scopes
http://docs.oracle.com/cd/E15523_01/web.1111/b31974/taskflows.htm#CHDFAIGC
http://docs.oracle.com/cd/E24382_01/web.1112/e16182/adf_lifecycle.htm


For persistent readers and investigators on bean scopes. Please refer to a very interesting discussion on EMG
http://groups.google.com/group/adf-methodology/browse_thread/thread/c7427b4b0b69766d

Lets move on to our scenario:
For the sake of this example, we are going to create a page template. Inside this page template we are going to place a menuBar with some menus and menuItems.


Then we are going to bind some of the menus to a backing bean. of scope View.  Why we want to have it in a View Scope? Well, this is going to be another detailed post about scopes. For now, lets say that we want to keep the binding alive during the life of the page (ViewPort)
We are going to create a new Java Class and we are going to name her ( I prefer to thing of it as a she :) )
TemplateBean.  Then we are going to create bindings to some of the menus:

templateBean


template page:


At this point, if we check our adfc-config.xml file we will see that the appropriate entry of the bean is written:


Next, we are going to create a taskflow and a page inside it. That page is going to use the previously mentioned template.


Creating the page based on the previously created template:


We are going to use the HR Schema for this example and the Employees table. We will generate the appropriate BC with the wizard of JDeveloper:


Up to now, we have completed the following:

1) Generated the Business Components.

2) Created a page template with some menus and menu items and binded some menus with a backing bean with scope of type View.


3) Created a task flow and a page in it that is using this template.

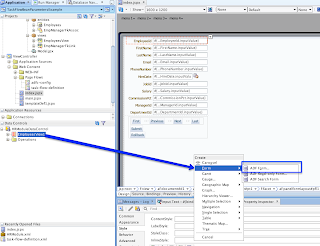
In the new page we are going to drag and drop the employees iterator to the page as a form:


There is an additional button with the rollback operation as you will see in the above picture.
This is added during the making of the sample application.

For this example application, we are going to have the following logic:

When the user changes the salary of an employee, menu1 will be disabled if the new value is greater than 100. if the value is lower or equal to 100.


NOTE: For the simplicity of this example we are going to have the menus enabled during query. The above scenario will take place only when changing values. This might not seem a real case scenario but the goal is to demonstrate the features of taks flows and their injection of bean instances to other instances.

Now, lets think about our case a bit... We have a template with some menus.. This template.. well is a template.. and for that reason it can be used in many cases and pages.. So it is not wise to bind it with a specific use case right? We have to keep the template menus loose and adaptive to any page..
We already have bindings to  a backing bean of those menus... Why not use them then?


We are going to create a value change listener method for the salary attribute of our page:


With the help of the wizard, we crated a managed bean with the Value Change Listener method for the salary attribute.

If we check the task flow properties now, we will see that there is a new entry there:


According to our scenario, we want to check the value of the salary attribute and disable the menu1 which resides in the template we created previously.

And here comes the magic.. All we have to do is to create a property in the bean of the page with the same type as the template bean, implement our logic and make the appropriate reference in the task flow...


Lets implement our Value Change Listener logic:


The only thing left now, is to reference to the appropriate TemplateBean instance.
This can be easily done in our task flow:


As you can see from the above picture, we create another managed Bean in our task flow. The one for the  templateBean.
Then, after selecting the aRequestBean, we created a new property and placed the correct name of the property, class and the instance we want to use.

Everything else will be handled by the framework.

It doesnt get more declarative than this!

And that is it!

Download Sample Application.

Regards.
Tuesday, December 13, 2011

Validator or ValueChangeListener. ADF 11g lifeCycle

Hi,

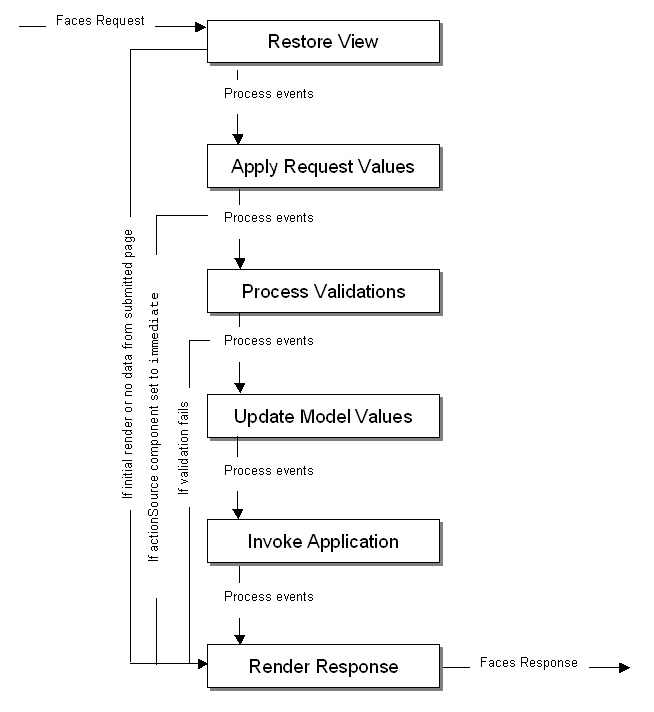
This is an example that will demonstrate the lifeCycle phases involved with validations and ValueChangeEvents.
There is some confusion on which is triggered first and when they are triggered.
This post will try to clear things a bit.
Even though the documentation is sufficient enough, this post will work as a helper by pointing only the important elements in order to understand the process as a general concept.

Download Sample Application.

According to the documentation:

http://docs.oracle.com/cd/E15523_01/web.1111/b31973/af_lifecycle.htm

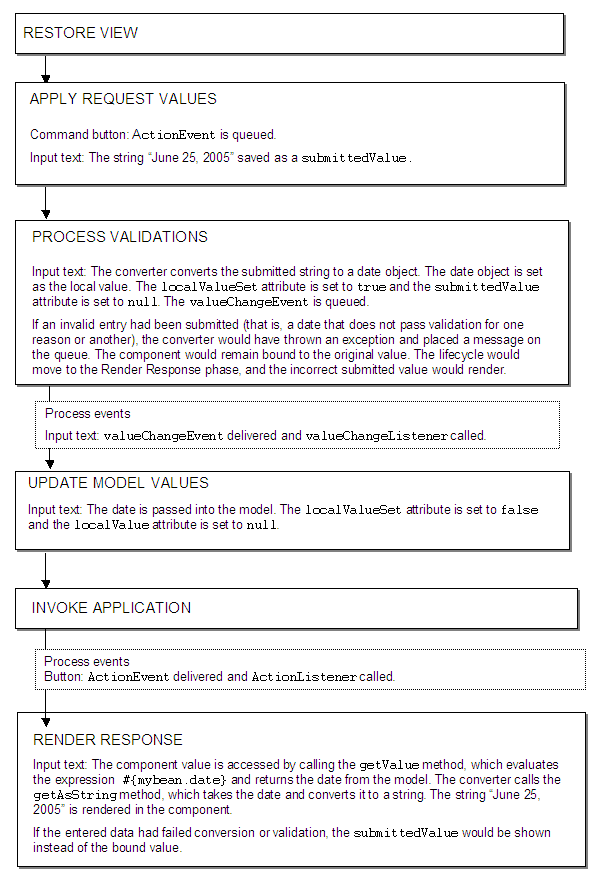
Validations should fire first and then ValueChangeEvents should be issued:


The two important phases in our case are :

Apply Request Values and Process Validations.

According to Documentation:


  • Apply Request Values: Each component in the tree extracts new values from the request parameters (using its decode method) and stores the values locally. Most associated events are queued for later processing. If a component has its immediate attribute set to true, then the validation, the conversion, and the events associated with the component are processed during this phase. For more information, see Section 4.2, "Using the Immediate Attribute."


  • Process Validations: Local values of components are converted from the input type to the underlying data type. If the converter fails, this phase continues to completion (all remaining converters, validators, and required checks are run), but at completion, the lifecycle jumps to the Render Response phase.
    If there are no failures, the required attribute on the component is checked. If the value is true, and the associated field contains a value, then any associated validators are run. If the value is true and there is no field value, this phase completes (all remaining validators are executed), but the lifecycle jumps to the Render Response phase. If the value is false, the phase completes, unless no value is entered, in which case no validation is run. For more information about conversion and validation, see Chapter 6, "Validating and Converting Input."


  • What we understand here is that, for input components, by default, the validations are going to be fired in the Process Validations phase. Furthermore, they have a specific order:

    1)  converters
    2)  required checks (check if it is required)
    3)  validators

    NOTE: Of course there are some other cases were the required checks are not fired.. but the above is the general idea.

    As you may have noticed, in the Apply Request Values phase, it is mentioned that if the component has it's immediate property to true, then the validations will take place in tha phase.

    Which means, that they are not skipped.

    What we understand here is that validations will fire no matter if the component is immediate =true or not.

    But when does the ValueChangeEvent is triggered?

    Again, according to the documentation:


    ValueChangeEvent is an intermediate phase between Process Validations and and updae model Values.

    This means that ValueChangeListener are invoked right after validations. It does not matter if the component is immediate true or not.

    The difference lays in the phase those operations will be executed.


    The case of the commandButton:

    CommandButtons will trigger the validations and valueChangelisteners of inputComponent while pressed. It is the same case weither the the button is partialSubmit and the inputComponent partialTriggered by the button, or the button is not partialSubmit.

    If we set the commandButton to immediate true, then some phases are skipped:


    According to documentation:

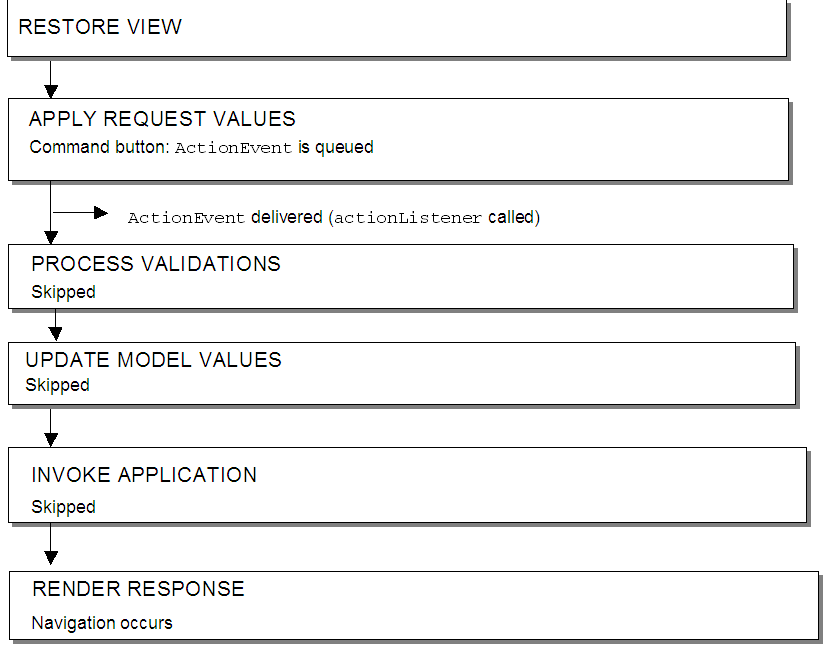
     When actionSource components (such as a commandButton) are set to immediate, events are delivered in the Apply Request Values phase instead of in the Invoke Application phase. The actionListener handler then calls the Render Response phase, and the validation and model update phases are skipped.

    This means that if the button is set to immediate only the ApplyRequestValues phase will be invoked, the Process Validations phase will be skipped.

    So, if we will have a selectOneChoice component with autoSubmit=false and immediate=false and a commandButton with immediate=true. 


    According to what we know so far, the commandButton will invoke the ApplyRequestValues phase and then render response phase. Our selectOneChoise, will invoke the validation and ValueChangeListener in the Process Validations phase.. which in our case, will not be invoked.

    So we are bypassing everything...

    If we want to invoke validators and valueChangeListeners while having the button immediate=true, we will have to have the selectOneChoice to immediate=true as well!


     why? simply because, according to documentation, while having the input component immediate=true, all validators and valuChangeListeners will be shifted to ApplyRequestValues. Which is exactly what we want.

    Conclusion: Validators are executed before ValueChangeListeners. They are executed even if the input component is immediate=true. The only change is the which phase they will be executed in.
    The combination of commandButton can bypass he validations and valuechangelisteners if it set to immediate=true. We can still have validations and valueChangeListeners triggered if we have the inputComponent to immediate=true. Since the validations and ValueChangelisteners will be triggered in a different phase and more specifically, they will be triggered in the ApplyRequestValues phase.

    Well, this is it.  Of Course we could continue investigating more programmatic ways and workarounds but this would be out of the scope of this post

    Download Sample Application.


    Regards.


    Thursday, December 8, 2011

    Create Description Attribute of an LOV Attribute. Using Reference Entities. ADF BC 11g

    Hi,
    In this example we are going to create a simple LOV and we are going to have an additional attribute as the description of that LOV.

    Download Sample Application.

    In more detail, we are going to use two entities in one View Object. The first entity will be our updatable entity. The second entity is going to be the reference Entity. The role of the second entity is to provide a description of the id if the first entity.

    So, basically we are going to have an LOV which will display meaningles ids and another attribute from another entity that will display the description of that id. The description will be a meaningfull message to the user.
    For this example we are going to use the HR Schema and the following tables:

    Locations,
    Countries.

    We want to show a form of Locations and we want to have the Country Id from an LOV.

    First we will create the Business Components with the wizard of JDeveloper.

    This will produce us all the BC:


    We simply left the Location View Object only. We removed all other views in the Application module.
    We want to show the Country name for the corresponding Country Id.
    Additionally we want to have the CountryId as an LOV.
    Lets Create the LOV

    First, we locate the attribute we want, CountryId in our case in the LocationsView vo and we press the  plus sign in the LOV section. On the new window, we press the plus sign again in order to set the List Data Source. In the new window(again) we shuttle on the right the CountriesView vo and we press ok:


    Next, we have to map the attributes we want to associate:


    Last but not list, is the apperance of the  List of the Values. We select the UI Hints in the same window and we shuttle the attributes we want to have them displayed in the list of values. Additionally, we set the type of the List to Input Text with List of Values.


    And that is about it. our lov is created. The next step is to associate our Locations entity with our Countries entities in the Same viewObject, the LocationsView.
    We go to LocationsView and more specifically in the Data Model. We shuttle the Countries entity to the right and we will see that the association is applied immediatelly. We select the join to be outer join just in the case of no data.


    Now that we have our entity, we are going to shuttle our desired attribute, which is the CountryName. Now that we have added the Countries entity we can shuttle CountryName from that entity. If we havent done that, we would not be able to show this attribute in the LocationsView.


    And we press OK.
    As you might have noticed above, we shuttled only one attribute, the CountryName and the PK is additionally shuttled. This is needed because the framework needs to update the association for every new value in the main CountryId from the Locations Entity.

    From the BC point of view, all  the mandatory steps are done.
    Off to create our jspx!
    For this example we are going to create a simple jspx form to our unbounded task flow. We are simply going to drag and drop our LocationsView iterator from the datacontrol to our jspx as a form:


    In the new window we are going to select the attributes that we want to display in our form. As you will see in the wizard, we will have the additiona CountryId1 attribute from the reference entity. we will remove that because we dont want to have duplicate components.
    NOTE: we could prevent this in the BC layer and the Display Hint attribute. The scope of this example is simply illustrative and aims to demonstrate the description functionality.


    As you see, we have the CountryId1 attribute to be displayed. We simply select it and press the red x button to remove it from the list. Another important think to notice here is that the wizard understood from the BC that the type of the List for the CountryId is List of Values and immediatelly converts it to the corresponding component.
    We press OK and after adding some additional buttons with operations we have our form.


    But we are not quite there... a few adjustments left.
    In order to properly display the CountryName in every change of the CountryId we have to make the CountryId LOV to AutoSubmit=true and place partialTriggers to the CountryName. The partial Trigger will be the id of the CountryId LOV component.

    AutoSubmit:


    PartialTriggers:


    And That is it!
    Every time we change value in our CountryId the CountryName will be updated accordingly.

    Download Sample Application.

    Regards.

    Wednesday, November 23, 2011

    Programmatically create new row of View Object in Application Module. ADF bc 11g

    Hi,

    this is yet another example of showing hwo to create a new row of view object in an Application Module method.

    Download Sample Application.

    We will use the Departments table of the HR Schema in this example.
    First we are generating the BC through the JDeveloper wizard.


    Then, we generate the java class of the Application Module:


    Inside the java class we place the following code:


    The usage of this method varies.. In this example we are going to use page button in a page.

    We have to do one more thing for that, expose our method in the client interface of the Application Module:
    We go to the java section of the Application module and we press the pencil icon in the client panel:
    In the new window, we select our method and shuttle it to right panel:


    For that we create a page in our unbounded task flow:


    Then we double click on the page, this will show us a wizard to help us create the page. This happens the first time only, the time that we want to actually generate the page.


    In this example, we are going to use a jspx..

    Then, from the dataControls, we are draging and droping the DepartmentsView onto the page as a form:


    we just accept the default options from the wizard:


    and press ok. The result looks something like this:


    Now, what we want to create a button that will call our Application Module method.
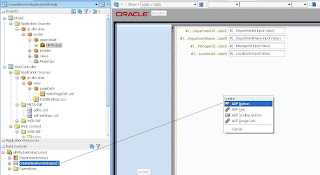
    All we have to do is to drag and drop our  method from the dataControl and select  ADF  Button:


    And That is it.
    If we run the page now, and press the button a new row will be shown.

    Download Sample Application.

    Friday, November 18, 2011

    Master-Detail-Detail. Using Tree Table and Table. Using Target Data Source featrue. ADF BC 11g

    Hi,
    This is an example demonstrating the usage of treeTable and table of ADF all together.


    Download Sample Application.


    We are going to use the HR Schema and more specifically the following tables:
    Departmens,
    Employees,
    EmployeesViewDetails.

    Departments and Employees are going to be the Master detail that will be displayed in the Tree Table
    the EmployeesViewDetails will be the detail table shown below the tree Table.

    After generating the appropriate Business Components through JDeveloper wizard, we are going to create an additional association and a viewLink.
    Because the EmployeesViewDetails is a database view, the associations are not provided by JDeveloper wizard.
    Furthermore, we are changing the the Primary Key of the EmployeesViewDetails from RowId to EmployeeId.


    Association:


    ViewLink based on that association:


    Finally we reach to a point where we will create the Application Module hierarchy:
    This is the tricky part. at this point, we have to understand two things:
    One, we are going to use the Target Data Source feature. This feature according to the following documents
    http://www.oracle.com/technetwork/developer-tools/adf/master-detail-moredetail-154767.html

    http://www.oracle.com/technetwork/developer-tools/adf/learnmore/sept2011-otn-harvest-508189.pdf

    needs to point value that corresponds to a key of the other iterator..
    Additionally the JDeveloper documentation for this feature says:

     So, what we have to do is to point the right value to the right Key..

    Two, Our hierarchy is not going to be the following:


    Is going to be the following:


    Now, why is that???
    Simply because, we want to use the target Data Source feature, and for that reason, we need to map the same key attributes.
    Further more, we do not want to show the details on our tree.... We just want to show it on a separate table.

    The concept is simple: We have to have the same keys to synchronize properly.
    Now, to our case, apparently, we cannot synchronize Employees and EmployeesViewDetails directly, for the simplest reason that we are on a master-detail-detail situation...

    In fact, our example is a very special case, because it is a pure coincidence that Employees and EmployeeViewDetails have the same attribute as a primary key.

    According to documentation, a draft and general explanation would be the following:

    the targeted Data Source iterator, will find a row where it's key value is the same as the key value of the selected row of the iterator that invokes the target Data Source iterator and will set this row to current.

    well, reading it again, it is not simple at all!! :D
    ok lets try again...

    The targeted iterator will simply search for a row in the list and make it current. 
    The key of that row, will have the same value as the key of the selected row in the tree.

    hmm... still not good..

    The iterator that uses the target Data Source  feature, will force the specified iterator to find a row with the same key value as the previous one.

    I give up.... :D
    Well, so if we had just added the EmployeesViewDetail without having it as a detail under Employees... we should have seen all employees and every time we selected an employee, the employeesViewDetail table would simply change the current row.
    And of course, we do not want that..
    So, the best approach is the one showed in the screen.
    Why? Well, when we select an employee from the tree, the target Data Source feature will invoke the other employees iterator, which in turn will invoke the employeesViewDetails iterator to refresh because, after all, it is a detail right?..


    Next, we are going to Create our page.
    First, we will create a task flow and a jspx on it.
    Onto jspx, we drag and drop the departments Iterator from the dataControl and we select, treeTable.
    Then, we add a rule for the Employees as shown in the Screen below.


    For Departments rule, we shuttle DepartmentId and Department Name attributes.
    For Employees rule, we shuttle EmployeesId, firstName and lastName.
    Next, we surround our treeTable with a panelCollection.  We Simply right click on the tree table component and we select panelCollection.


    Since treeTable component, does not create other than the node column, we will create them ourselves.


    After that, we surround the panelCollection with a panelGroupLayout with type Scroll. This will be the parent Container of both, our treeTable and table.


    At this point, we have to apply the target Data Source feature. As we explained earlier, we are going to set this feature for the Employees detail iterator of the Departments master iterator. This Employees iterator will point to "other" Employees iterator.
    But first, we have to add this iterator. So in our page definition we add the other Employees as iterator.

    Then, we are going to set our Target Data Source value.
    We simply select the tree of Departments and then the rule of Employees,
    after that, we expand the target data source option and open the help wizard to choose our iterator. The iterator would be the "other" Employees iterator.


    Now, every time we select an employee from our tree, the "other" employees iterator will change the current row to the same as the selected in the tree.
    All we have to do now is to drag and drop the EmployeesViewDetails from our Data Control


    After that, we surround the table with a panelCollection (the usual best practice..) and set partial triggers to table from the tree table.

    And that is it!
    When you run the page you will see a row in the empsDetailsView ofcourse, since it is querying, but this is not the scope of this post.. When ever you select an employee the table will be refreshed with the employee's details.


    Download Sample Application

    Regards.

    LinkWithin

    Related Posts Plugin for WordPress, Blogger...